Showing posts with label Bakes. Show all posts

Christmas Fruit Cake

How to make Christmas Fruit Cake | Easy Christmas Fruit Cake Recipe
There's something extremely gratifying about making your own cake and gifting your loved ones with yours. Usually, its days ahead of Christmas that I begin with the process of soaking fruits in booze and later bake them into a fruit cake that sits for a couple of days before being brought out to share. Each year, we have our family, parents, sister, brother-in-law and few close friends to whom the cake goes out to. Beyond celebrations, we seek joy in togetherness, sharing and the art of giving.

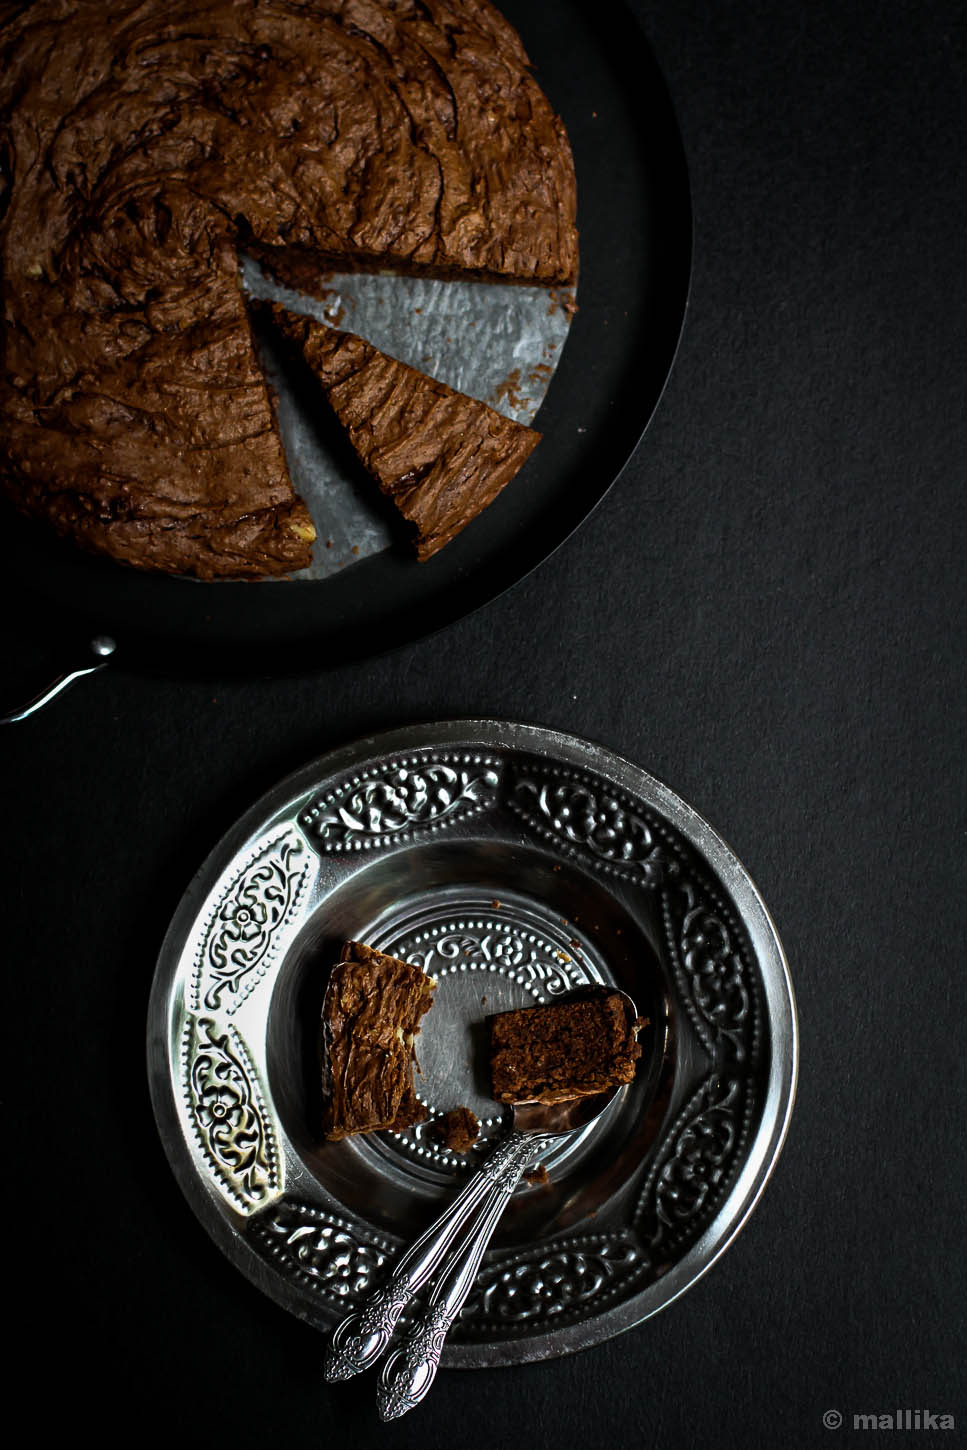
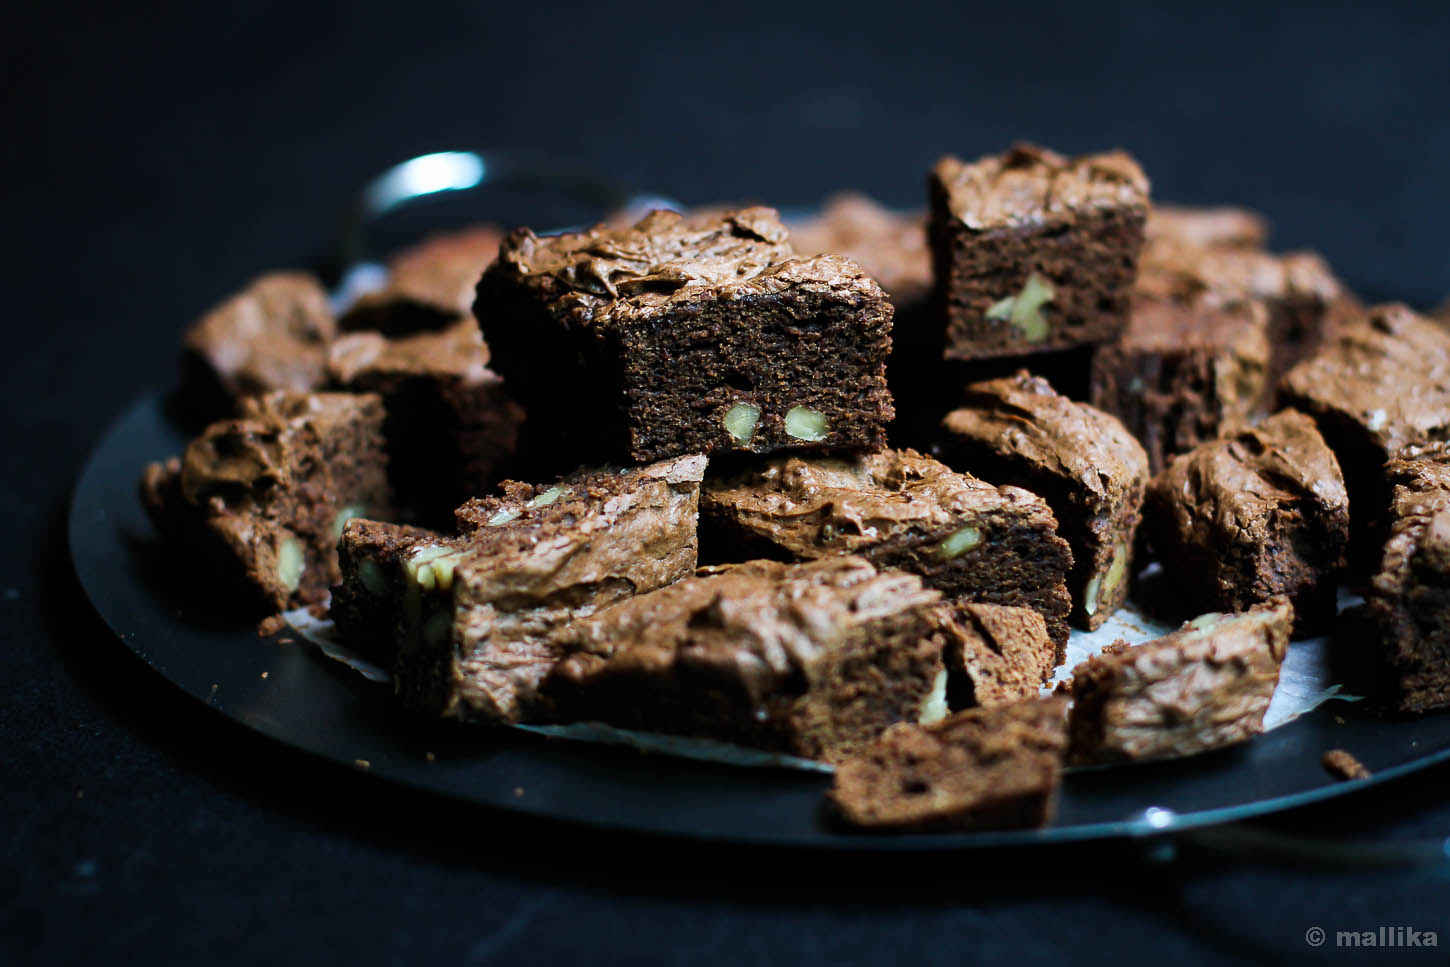
My dear friend Lubna is hosting a virtual Christmas party at Yummy Food this year. Ever since her invite, I was left to ponder what I could take along to the potluck, that, it should not only be apt for this celebration, but can also be enjoyed by the young and old without reservations. I scuffled through many options I had on mind - cookies, breads, gateau cakes, or petite fours? None gripped my mind stronger than one. Soon it was sorted. My heart was set on this Fruit cake, and nothing seemed more gratifying than sinking my teeth into a good Christmas Fruit Cake that's speckled with fruits and nuts, bursting with flavor from spices, and left plain without frosting. Simple, yet rich, its gloriously satisfying even with a small piece. Its a tradition to solemnly indulge in Kuswar, (the assortments served during Christmas) for someone like me who grew up in Mangalore. I'm away from home, oceans away from my family whom I miss dearly, so this fruit cake had to be it. Its a thing I delve into every single year, because, it brings back many fuzzy memories of home, family and friends in Mangalore.

I've made many fruit cakes in the past, like this, this and this, each with subtle variation in the recipe and fruits used, all decadent and boozy in nature. I was armed with a kitchen scale, measuring out by grams to the tee, in my initial years, but now a measuring cup does the job well as I can tell well if the cake will bake to perfection or not by the look of its batter. A good Fruit Cake holds a special space in my heart, it doesn't matter if the fruits are soaked over months or made in an instant like the one I have at Yummy Food's party today. Its a simple cake, but packed with flavors from spices and fruits that makes it so luxurious and indulgent. I stick by using a non-alcoholic mulled fruit drink in my recipe, so you don't have to worry if you have a young kid to cater to, but feel free to substitute with a booze or fruit juice of your choice.

So join me over on Yummy Food as we celebrate this season of reflection and celebration. We'll soon leap into the new year that brings along more hopes, positivity and strength. Come let’s bake this cake to celebrate the last leg of 2016 and welcome 2017 with arms wide open. Before you hop over, here's me wishing you all a Merry Christmas and a Happy New Year!

Christmas Fruit Cake Plated

Easy Cinnamon Rolls

How to make Cinnamon Rolls with Cooked Frosting | Easy Cinnamon Rolls Recipe
With Christmas around the corner and less than 4 days to go before you can sing Hallelujah, the Lord has come, I thought I'll peep in to help you with a lovely classic breakfast for your family to wake up to this Christmas morning. Its typically Western, hearty and sweet to call your morning off to a good start, supple enough that you may want to lay your head on it and snooze again, gives you the comfort of your bestie's company, and is the festive sorts that you can set up on table for your guests to dessert on.

Rising Bread DoughCinnamon Rolls (1)


For the longest time, I've had aversion to cinnamon in all things sweet. Let me not even get to the whys of it, for all I know, cinnamon in my arena existed best in the legion of savories, given the exception for a good Christmas fruit cake where it favorably unites with clove, cardamom and other spices, veiled in a way that it does not hit your senses directly and ruin the flavor. But, here it comes finally, the world coveted Cinnamon rolls looming right out of my kitchen to yours. I’m close to being a convert, convincingly not a cinnamon-dessert-hater anymore. These don’t look a lot like the traditional rolls. I mean they are not enormous in size to consume your palm, certainly not the perfect looking rolls that stand flawlessly edged shoulder to shoulder giving them a clean rip, nor do they bask in the sugary coated frosting that sinks into every groove merrily.

I would probably rechristen these as cinnamon pull apart rolls; owing to the pans I had and the amount of dough I made, they ended up this way. But they are cinnamon rolls essentially, so let's stick to that. They don’t snatch away the authenticity from the traditional ones. They smell great in and out of the oven, are near identical in their recipe, forgiving the eggs in the dough. They sat squishing in an eight inch round baking pan, my ideal dish to bake a nice chocolate cake in, but this time around they doubled up as my bread pan too, saving me gracefully from sunken cockeyed bread had I baked them in my ten inch dish instead. They nudged for space as they puffed up on their second sitting, and, by the time they were out they looked glorious in their golden crevices and sugar burnt hunches, flattering into characteristic pull apart rolls that need to be forked by the thumb and forefinger to tear them apart from their siblings. There’s a fun thing to it, to tear it apart in submission in an imperfect way and dunk it in milk over giggles and laughters with our little girl while tapping our feet to the melodies of Christmas jingles. That’s when you know you are up for a good start to a holiday season.

Cinnamon Rolls (2)


The frosting is purely optional. As for a daily bread, I would stay away from frosting these. They are sweet on their own and make a wonderfully perfect Sunday breakfast with a slather of some salted butter, or cream cheese and coffee by the side. But we are in a holiday season, and that calls for some adornment on the table to give it a festive ring. I have a clean, less sweeter old fashioned cooked vanilla frosting recipe that works really well for me. Since the bread is sweet by nature, a lighter frosting like this one is pleasing to our tastes. Unlike the traditional frosting where you mix milk to confectioners’ sugar till you get a desired consistency, this one is far better version that gives me a similar thick pour-able consistency, albeit far less sweeter than the original version. Give it a try, may be you'll fall for these too.

Cinnamon Rolls Plated


Cinnamon Rolls with Cooked Vanilla Frosting

INGREDIENTS

For Cinnamon Rolls:

2 1/4 cups all purpose flour
3/4 cup milk (I used full fat milk)
1/4 cup butter
1/2 tsp salt
1/4 cup coconut sugar
1 tsp. active dry yeast (or rapid rise)

For the Cinnamon Sugar Filling:

1/4 cup light brown sugar
1 tbsp. cinnamon powder
2 tbsp. melted butter

For the Cooked Vanilla Frosting:

1 cup full fat milk
3 tablespoons all-purpose flour
1/3 cup coconut sugar
1/4 teaspoon vanilla

DIRECTIONS

Heat the milk and butter in a large sauce pan till the butter has melted into the milk. Remove from heat and add in the sugar. Stir well and allow it cool down to lukewarm. The milk should be tepid enough to activate the yeast, but not too hot, else will kill the yeast.

Transfer the warm milk to a large mixing bowl and sprinkle yeast into it. Let it sit for 10 minutes, so that the yeast can feed on the sugar and froth.

Next, add flour starting with 1/2 cup at a time and stirring well as you go. Once it forms a loose batter, add the next half cup of flour and stir well. This will help activate the gluten in the dough and yield soft supple dough, resulting in a good, fluffy bread. Continue using all of the flour and stir well with each addition till it comes together to form a sticky dough. Knead it for a minute or two till its soft and supple.

Place the dough in an oiled deep dish and cover it with a dish cloth. Let it rise in a warm place for about 2 hours. By this time the dough should double in size.

Transfer the dough to a lightly floured surface. I use the clean kitchen counter top that provides me ample space to work my dough on. Using a flour dusted rolling pin, roll the dough into a thin long rectangle. Brush it generously with melted butter. Prepare a mix of sugar and cinnamon powder and sprinkle it generously all over the dough.

Starting at the longer edge side, roll up the dough as tight as you can till forms a long log. To avoid opening up, place the seam side down. Using a cleaned knife dipped in flour, cut the log into slices of 1.5 inch each. Butter a 8x8-inch round baking tin. Place the rolls into the buttered tin, next to each other. Brush the rolls with some melted butter. Set aside to rise again for 45 minutes.

Preheat the oven to 350 degrees F. Bake the rolls for 25-30 minutes or until the bread is golden brown in color. If the top of the bread seems to change color sooner, while the underside still seems uncooked, cover the top with an aluminium foil and continue to bake till done.

Remove from oven and allow it to cool completely. Frost as desired.

For the frosting, combine milk and flour in a saucepan. Cook over medium low heat, stirring constantly, for about 3-5 minutes. The mixture should thicken and come to a boil. Add in sugar and stir well. Boil till the mixture coats the back of a wooden spatula, i.e. of custard consistency. Turn off the heat. Stir in vanilla essence. Cool completely. Before serving, whisk the frosting really well and swirl using a spoon on the cinnamon rolls.

Eggless Cinnamon Buns

Banana Oatmeal Cookies Snack

How to make Healthy 3 Ingredient Banana Oatmeal Cookies Recipe
The calendar on the bottom of my screen reminds me each day how fast we are getting close to the end of December. That means, we are just 2 weeks away from waving goodbye to this year (stop twitching your eyes, will you!) and, we are only 7 nights away from Christmas! 7 nights, that's just about a week. Yes, yes, just about a week I said! Sooner we bat our eyelids, that will be snapped away too. Now hope you are not smirking at me or raising your eyebrows in an oddly muddled way! If you did, then I assume you have sprung up on your toes and are heading right to your desk to grab that paper and pen to sort your Christmas shindig. So by this time around next week, I imagine the table will be laid out, and cutleries matched up, stockings set up high on the window sill where the fairy lights are twinkling in a chord, rushing through last minute gift wrapping and cookie plating, and in the reclusive spot of your home there may be a party planned with folks boisterously chiming in Merry Christmas while sipping away some eggnog.

I don't mean to scare you by any means. While we are nearly there in the last lap of the year with another 15 days to go, we are still left with the best few days of 2016 to live with. I wanted to knock your door and remind you on that. By that I mean, I wouldn't want you to burn out and hyperventilate planning the whole carte du jour for the D-day celebrations, rather take it slow and easy, plan with a breather, living the last few days of this year insanely happy, making it a memorable one.

Banana Oatmeal Cookies Ingredients 1

Banana Oatmeal Cookies Ingredients 2

Banana Oatmeal Cookies Prepped


We got the taste of our real winter snowfall yesterday that lasted a couple of hours. By end of the day, all the white snow flaked icing was one into a slushy mess. Predictions are it will continue to snow over the week, slipping into weekend. This morning we woke up to see our world swallowed by mesmerizing white everywhere. I dumped myself in layers and layers of warmers, mufflers and whatnot, yet, chill air was strong enough to render my eyes watery, feet numbed and nose tips frosted. By the time I was home, my coconut massaged hair had frozen to thick dreadlocks and my toes had lost their sense of belonging. Today was the coldest winter I've ever witnessed in my life, and this is just the beginning, an experience worth a memory, a teaser to what lies in the months ahead. Now I'm seriously thinking of a balaclava, no matter how comical I may seem.

In the run to year end celebration, I've turned on my oven to warm up our home and bake some delectable goodies. Between churning out my favorite fruit cakes that will go out to friends and colleagues, I have some healthy cookies baking on the side, that serve as an instant solace to curb the cravings of my little girl and me. While the air is heated and scents of fruits and spices waft through the kitchen, these cookies are made instantly with left over bananas, some oatmeal and chocolate chips, just 3 ingredients put together into a loose dough and baked to form soft cake like cookies. They are an instant ramification of salvaging some near dying overripe bananas that are honey sweet and boost of potassium in abundance. They are healthy, have no fat, can be customized to your will by replacing chocolate chips with nuts and raisins of choice, are gluten free, dairy-free, can be easily passed on for breakfast or on-the-go snack at odd hour with no guilt. Now that's what you need on your hand while you are raking your brain sketching out the Christmas menu. Go ahead and bake these along too.

Banana Oatmeal Cookies Served Healthy Banana Oatmeal Cookies 1

Banana Oatmeal Cookies

Healthy Banana Oatmeal Cookies 2


Healthy 3 Ingredient Banana Oatmeal Cookies

Prep Time: 5 mins | Bake Time: 12 mins | Yields: 9 medium sized cookies

INGREDIENTS

1 large overripe banana
1/2 cup quick-cooking oats*
1/4 cup chocolate chips*
1 tsp. vanilla extract (optional)

DIRECTIONS

Preheat oven to 350°F.

Mash the bananas in a medium bowl. Add the oats, vanilla extract and chocolate chips. Stir in well to form a loose dough.

Using an oiled spoon, drop a tablespoonful of the cookie dough to a baking tray. Flatten them down gently into a disc shape if desired.

Bake for 12-15 minutes. Remove from oven and allow to cool on a cooling rack. Serve with tea or coffee or take as an on-the-go snack.

Banana Oatmeal Cookies (2)


Notes:

* Use gluten-free oats for gluten-free option
* Use vegan chocolate chips for vegan option
* Replace the chocolate chips with raisins or nuts like almonds or walnuts for a nut based option
* Vanilla extract is optional but highly recommended for more flavor. You can do without it however.

Clementine Scented Almond Biscotti 1

How to make Clementine Scented Almond Biscotti | Easy Orange Almond Biscotti Recipe
The mornings since a week have turned wonderfully chill. Its been cooler than any other month I have known in Bangalore the past year. It’s been a while since we’ve been going to bed tucking the quilt snugly till our necks, windows partly open to let the cold air in, and without the usual sounds of whirling fans putting us to sleep. I scuffle in hunt for my home slippers which I don’t else care for. I love walking barefoot at home. The sounds of bare feet slapping against the floor, thap thap thap. It has a thing to it. Like adding music to the silent mornings. A melodious slap. Have you ever thought so?

The nip in the air has taken over the water too. They seem to be flowing from the refrigerators above and I can barely rinse after brushing, the mint flavor in the toothpaste adding to the effect of its chillness making my mouth go nearly numb. I stepped out this morning to put my sandals on; within minutes though, I rushed back in and led myself into the closet that stores many long forgotten things. Under the hiding of my ill-fitting jeans and handful of old salwar kameez, I pulled off my good ol’ maroon winter scarf (which had its ornate prints faded out in its seclusion, I yet love it), wrapped it around my neck, crossed my hands to chest and walked my way to work. The homeless dogs had gone into hiding, probably looking for warmer shelters under the extended roofing of kirana stores. There they sat warming up against the heap of ugly gunny rugs, rolling over lazily, snugging deeper into them. Above, the leaves wavered, their sway hushed, like the pendulum of a wall clock in a slow motion. The strollers on sidewalks had many like me who tucked their arms firmly across their chest, others burrowing their fingers deep into the slots of their jeans, their shoulders stooped; while women held to their scarfs covering the faces with their eyes stealing glimpse to the world passing by, as they rode pillion on the bikes.

Biscotti First Bake Almond Biscotti First Bake SlicedClementine Scented Almond Biscotti 2


Behind the pads of clouds I see sun poking out. By 8 am or so, the sun is out in its full glory. It’s the kind of weather I love. Cool, bright and sunny; the gentle warmth from sun seeping tenderly into my skin. It promises me that the day will turn good. There are no resolutions this year. Only optimism. An eagerness to see what future holds for us. No matter what, hope is mightier than all. Hope for positivity and accomplishment of many unspoken promises. That brings me to craving a good cup of masala chai and these Clementine Scented Almond Biscottis I baked in the mid of last year while in US when the weather turned this way. When the skies brightened and the cold air made us snug, we dunked biscottis and drank tea. Decembers and January of Bangalore ought to be like this. The season of winters. The season when oranges appear in plenty. The season to warm up. The season to eat almonds. The season to bake. The season for a reason to bake.

So I craved these biscottis and baked them again. The original recipe calls for clementine oranges. It said mandarins or other fruit zest will work too. I tried these again replacing clementines for Indian oranges and they were zesty and flavorsome. Although these photographs come from the time I baked them with clementines, let your imagination drift away to try other flavors. During that vacation, I spent many evenings flipping pages of cookbooks I had borrowed from the nearby State library. The flipping, the photographs, the intros and side notes for the recipe had often inspired me to get on my toes and rush to bake. This recipe comes from one among them. I wish though I had noted down where it came from. I promise, the moment I figure out, I shall credit it duly. For now, I hope this biscotti brightens up your day irrespective of the weather in your country.

Clementine Scented Almond Biscotti


CLEMENTINE-SCENTED ALMOND BISCOTTI

INGREDIENTS

1/2 cup / 70g caster sugar
1 large egg
Grated zest of 1 clementine / mandarin / Indian orange
2 cups / 150 g plain flour
½ tsp baking powder
50g raw, whole almonds, skin on

DIRECTIONS

Preheat oven to 180C. Line a baking tray with baking paper.

Place the eggs, sugar and zest in a large bowl, and beat it in a food processor or with an electric beaters until its pale and creamy. Fold in the flour, baking powder and almonds. It should be quite a wet and sticky dough at this point. Scrape the dough onto a floured surface and knead gently to bring it together. Shape the dough into a long log.

Place the dough log on the baking tray and bake for around 20 minutes. The dough should be fully cooked through before removing the logs from the oven. Allow to cool on a baking rack for 30 minutes.

Using a sharp serrated knife, slice into 0.5 cm thin slices. Place the slices on the baking tray and bake on each side, till the edges begin to brown. It took approximately 10 minutes on each side. Remove from the oven and allow to cool on a baking rack. They will continue to crisp up as they cool down. Once completely cool, enjoy them dunk in milk, tea or coffee of your choice. Else, store these biscuits in an air tight container.

NOTES

- You can replace the clementines for mandarins too. Clementines and mandarins belong to family of oranges. Indian oranges will be a great substitution.
- You can try replacing oranges to lemon zest for a lemony flavor.
- You can replace the almonds for nuts of your choice. I haven't tried dry fruits yet, but I am sure they would be wonderful too.


Tomato Three Cheese Thin Crust Pizza

How to make Tomato Three Cheese Thin Crust Pizza Recipe
Another month has gone by and boy, October is here! I had promised myself to get out of the cocoon and post atleast couple of more recipes before the end of September, but I failed myself again.

The changing months remind me how blessed the second part of the year has been, particularly this year with some long weekends falling back to back over the past 3 weeks. We had Ganesh Chaturthi fall on 18th Sep, the Friday, followed by Bakrid on 24th, the Thursday last week. It came as an advantage when the leave on Thursday was called off and pushed to Friday. As an unplanned holiday, we decided to make the best of a long weekend break, stayed home, sewed some teeny-weeny clothes for the little girl's barbie, napped well in the noon and baked some delicious pizzas for our dinner.

Pizza dough prep Pizza dough prep_1Pizza dough prep_2


For a long time now, making pizza at home has not just been a menu of convenience and break from the usual course, but very therapeutic when made from scratch. Its a joy to watch the yeast act it's way through the dough, rise and double it up. Intimidating it may sound. But there's hardly anyway one can go wrong with a pizza flatbread if the yeast has played its part well.

Making the dough and sauce from scratch indeed calls for some pre-planning and can end up being time consuming if you are time crunched, but this is what makes the most delicious pizza, with slices that are endearing and smell of freshly baked bread, topped with molten lava of cheese to boast.

So, I've made pizzas several times at home. Combinations vary. Toppings change. Each time they evolve. Yet, every time they sing of freshness and subtlety. The flavors burst and melt with each bite. At times they are made quick, simple and unpretentious, on other occasions they can be fancy with a varirty of vegetable toppings. I decide toppings on a whim, unplanned and unprepared. But they hardly matter. When you have good cheese to camouflage, you always have sumptuous and satisfying slices on your plate and lips that curve into a smile. Don't forget, a well made crust and good cheese is the key, and you have a winning recipe.

Pizza prep


There are several recipes available for a good pizza dough, but this recipe always works like charm for me, especially when I prefer to use whole wheat flour. It may seem unusual to use milk based bread recipe in a pizza dough, but I prefer it for the soft, supple and airy results it provides to a dough base that holds the sauce, vegetables and cheese well, yet doesn't lose its texture. The whole wheat flavor adds a healthy twist with a nice nutty backdrop to whatever toppings you want to layer on.

One of the reason why I love keeping the crust on the thinner side is that the dough doesn't require time to rise after proofing nor requires par-cooking. As the dough rests and doubles, you prepare the sauce, cook, simmer, season it and let it cool. Then you roll out the dough and let it rest on the counter while you prepare the toppings. For a recipe like this three cheese tomato pizza, all you need a good dough base and a fresh tomato basil sauce with three variety of cheeses you can get your hands on. Remember, mozzarella is a must for that gooey-stringy mess. The others are much upto your choice. I suggest you get the best fresh mozzarella possible. I chose a combination of cheeses with high, medium and low melting points. Ricotta has a low melting point, and I paired it with cheddar and mozzarella with medium to high melting points. That helps avoid this pizza disintegrate into a cheesy mess.

Tomato Three Cheese Thin Crust Pizza_1


Tomato Basil Pizza Sauce

INGREDIENTS

8-10 pods of garlic, finely chopped
1 1/2 cup tomato puree
1/4 cup tomato sauce (optional)
1/4 cup of fresh basil leaves, torn
1 tsp. dry oregano (optional)
2 tbsp olive oil
Salt and Paprika to taste

DIRECTIONS

Saute finely chopped garlic in oil for 2 mins till they turn transparent. Add the tomato puree and stir well. Simmer and cook for atleast 15 minutes or till it reduces and leaves oil from the sides of the pan. Add in the tomato sauce and stir well. Cook for another 5 minutes. Add in the freshly torn basil leaves, dry oregano herbs (optional), paprika and salt to taste. Stir well. Turn off the flame and set aside to cool. Use this sauce to spread over the pizza base.

Three Cheese Tomato Thin Crust Pizza

INGREDIENTS

For the dough base:

Follow the recipe here or use a store bought thin crust pizza base

For the homemade sauce:

Homemade (recipe above) or store bought pizza sauce

For the toppings:

1 large tomato, de-seeded and sliced in rounds
1 onion, sliced
1/4 cup ricotta cheese
2 slices of cheddar cheese, torn
1 cup mozzarella cheese, grated
Salt and pepper to taste
Italian seasoning / Italian herbs

DIRECTIONS

Pre-heated oven at 200 deg C.

For a thin crust pizza, roll out the pizza dough as thin as possible, about ¼ inch thick. Prick all over the pizza dough using a fork. Allow it to sit on the counter for 10 mins.

Place the pizza on the pizza tray. Top with homemade tomato sauce and slather it evenly. Top with sliced tomatoes and onions. Sprinkle drained ricotta cheese, followed by cheddar and topped by generous amounts of mozzarella cheese. Bake in a pre-heated oven at 200 deg C for 20-30 minutes or till the cheese melts and the edges of pizza brown. Slice into wedges and serve immediately.

Tomato Three Cheese Thin Crust Pizza

Avocado Brownie

How to make Avocado Brownies | Recipe for Healthy Brownies | No Butter Brownies
My weakness for brownies is not quite known to many. I love this sense of being discreet, like an affair that's quite so sincere. It first began years ago, when I joined the corporate industry to begin my career and I lived by myself for those couple of years. During those days, many weekends were spent hanging out at Corner House ice cream parlors in the heart of South Bangalore. Among the wide variety of ice creams in all permutations and combinations they had on menu or the life sized colorful posters of sugar-cherry topped neat ice cream scoops that adorned their walls, Brownie Fudge Sundaes it mostly was. It won my heart like none other could. I would go there nearly every weekend till I had had enough of it to overcome my cravings. At times I got them packed in disposable containers and took them back home. On most occasions, I would sit by the glass window and let the world pass by unnoticed as I indulged slowly scooping out the layers of nuts, chocolate fudge and vanilla ice cream that sat over the fudge soaked warm brownies. As the cold ice cream melted over the warm brownies and hot chocolate sauce, it created a pool of molten sweet puddle, soaking the brownie in it and making every bite of it gratifying and soothing to the fourth sense. It's what I call chocolate nirvana, bringing joy that makes life worth every bit.

I revive those days, much in reverence of being ignorant about what it meant to count calories or care for the waistline. More so because I cooked and ate mostly at home, so this was a sweet deal I sought comfort in for the week long slog at work and to beat the boredom of cooking and eating at home.

Avocado Brownie Prep

Avocado Brownies


The harsher side is that brownies have never known to be healthy. You and I know that a good brownie needs a great deal of butter, ton of delicious sweet dark chocolate and a couple of eggs in varying degrees, depending upon how fudgy or cake-like you love your brownie to be. In sum, its pretty calorie laden that makes it so sinfully decadent.

It may sound like I am deceiving you a bit here, trying to sell you my brownies by calling them waistline-conscious, healthy and diet-friendly; yet with all the same decadence as what the classic brownies are. Believe me they are incredibly good!

Avocado Brownie Sliced Avocado Brownie


If you have excess avocados lying around like I had in plenty, you've got to make these. Let loose your fears and whip together all good ingredients to make these brownies. What makes them different is that there is absolutely no butter used in them. They are nearly fat free with the avocados lending all buttery sheen and fat. And I promise, you don't entirely taste the avocados, unless you have a strong nose and taste buds that poke through it sensitively.

Although I chose to go with all purpose flour in this recipe, quite so in fear of not turning this into an inedible disastrous recipe, I feel certain that wheat flour or a combination of wheat and all purpose flour should easily substitute with no compromise to taste.

This recipe comes as a blessing for not just being healthy, but they make a great base in recipes that call for chocolate cakes and brownies. I made some brownie ice cream with these and that brushed off some guilt of being calorie conscious. They are great crumbled in trifles too, pairing beautifully in a good amount of fruity elixir. And ofcourse, if you've made these, then do not certainly forget to make some delicious Brownie Fudge Sundaes to share with your friends over a dinner party.

Avocado Brownie


"Healthy" Avocado Brownies

Inspired from here

INGREDIENTS

1/2 cup mashed avocado (about 1 medium avocado)
4 oz chocolate, chopped & melted (I used 1 bar of Hershey's dark chocolate)
3/4 cup organic raw cane sugar
2 large eggs
1 tbsp. pure maple syrup
1/2 cup unbleached all purpose flour
2 tbsp. cacao powder
1/2 tsp. sea salt
1/4 tsp. baking soda
1/4 cup chopped walnuts

DIRECTIONS

Preheat oven to 350 degrees Fahrenheit. Grease and line an 8x8 baking dish (either square or round) with parchment paper. Chop and melt the dark chocolate in a microwave for 30 seconds or on a double boiler till its just melted. In a food processor, whip up all the ingredients except the flour, baking soda and walnuts till they are homogeneous. Sift the flour and baking soda into a food processor bowl and pulse until well combined. The resulting batter will be very thick. Pour this batter into the prepared baking dish and level it with the back of a knife. Bake for 30-40 minutes, or till a skewer inserted in the center comes out nearly clean. Let it rest in baking dish for 5 minutes and cool further on a cooling rack.

Avocado Brownie Cubed

Peach_Puff_Pastry_Tart_1

How to make Peach Puff Pastry Tart | Easy Peach Puff Pastry Tart Recipe
July has been a wonderful month bringing bounty produce and tons of inspiration to my kitchen. Its a month when all things living bud and bloom to glory. Foliage brim to lush greenness, healthy and flourishing. Weeds crawl themselves on to every inch of wilderness. Flowers burst into frenetic bloom. Markets bustle with vegetable produce in vividness and abundance. Fruits and berries make their way into our lives beyond what we could ask for. There's burst of color and splash of summer everywhere. July pampers you. It makes you feel luxuriant.

Summers here have been all high and at times 94 deg F (34 deg C) feels like 105 F (40 deg C). Yet, I am so much a tropical girl that I make best friends with summer and its givings. There is no moment left to slip away in rambling about heat. Instead we go farm-foraging for fruits with bags and baskets. At nearly the end of berry season, peaches and melons are here to replace them on stands.

Peach_Puff_Pastry_Tart_2


In less than a week, the daughter and I are heading back home, to India. Over two weeks ago, our little girl stopped her school here to resume the one she goes back home. She gets a small break before she gets back to track on another routine in India. As we've just begun bag packing, I shudder to think how quickly these three months have flown by, insanely quick, like a flash of lightening. While I'm thankfully lucky to be on a break from work and make a trip here the second time, it feels so unreal that its time to leave D's nest and fly back to another nest far away in another continent. Again, we leave in hopes and prayers for sooner family union.

These three months of vacation time have been wonderful. We witnessed the onset of spring and the way they silently slipped into summers, bringing with them the best of everything we love - the sunshine, the beaches, the road trips, the camping, the late evening partying, the farm foraging, berry picking, the evening walks at parks, the book hunting at the library, the lazying by the porch, the summer cooking, and lots more we did together. Instead of rumbling how much we will miss D and the moments we spent here with him, I leave you with this simple peach puff pastry tart that speaks bounty of summer - golden summery ochre with velvety skin and a delicate sweet aroma. Its so easy that you would be ashamed as put them together and shove them to the oven. Ofcourse that doesn't account for making puff pasty at home. But if you have them handy, you get away with assembling this in under 10 mins and another 20 min to bake, which is the oven's job!

Peach_Puff_Pastry_Tart_3


Simple Peach Puff Pastry Tart

INGREDIENTS

1 sheet homemade / frozen puff pastry
2 medium peaches
1 tbsp. of brown sugar (adjust according to the sweetness of your peaches)
2-3 tbsp. milk, to brush
1 tablespoon granulated sugar
Few pecans and mini chocolate chips to scatter

DIRECTIONS

Preheat the oven to 420 degrees F. Carefully roll / cut the puff pastry into strip of 4" x 8" inch. Cut the peaches in half and remove the pit. Slice peaches carefully into 1/4 inch. Arrange the peaches on the puff pastry overlapping each other. Sprinkle the peaches with brown sugar, pecans and mini chocolate chips. Brush the edges of the puff pastry with milk (alternative to egg) and sprinkle with sugar. Bake for 18-20 minutes or until the edges are a deep golden brown. Serve warm, preferably with a dollop of whipped cream or ice cream.

Peach_Puff_Pastry_Tart_4

Blueberry Muffins


It takes me a while usually to compose myself a good deal of writing here, that's if I have stayed too long away from thinking or haven't perched my fingers on the keyboard for a while. Although this not being the case always, I still feel like a sophomoric with words, for today. Where do I begin? What do I tell you?

We are past a week since the 4th of July and I hope you had a wonderful one like we did. Usually, for us, the 4th of July passes by without notice. That's if we were in India, it would have been just another day. Just like how the 3rd of July rolls up on the calendar, follows into the 4th and then into the 5th. But here in the US, it means more than just that.

I did not grow up learning a lot on American history. I don't remember a streak of it either. 4th of July passed as just another date on the calendar. Many years later when I started working, as part of the corporate curriculum, we were trained on the nuances of American lifestyle, their culture, and in general, their ways of life. We were taught, that while dealing with American clients, how one had to roll their tongue to get the 'R's right; a lesson or two that might impress an American and make us sound like one among them. It also preceded into understanding their holidays - the most essential and beneficial part of the training which came with some promises that every offshore engineer had an obligation to know. A promise of leaner workloads on those holidays, one that each of us looked forward to, a promise that one could possibly take a day off and travel far off place to meet their loved ones and share an extra day for the weekend. A promise that we could catch up some extra hours of lunch and coffee breaks that day. There were just a handful few to remember. Those handful that could be counted on fingertips, all defined well by dates and not by planetary movements like ours did. What thrilled us beyond all was the fact that most of these Federal public holidays were observed on the day preceding or succeeding weekend, irrespective of the day of week or weekend it falls in the year.

It intrigues me often why American Independence Day is always greeted with 'Happy 4th of July'. It could well be wished as Happy Independence Day! But like how most cultures are woven through customs and long time traditions, this one still remains to be called Happy 4th of July. So, I ask I hope you had a good one! And, if you know better, let me know why its a 'Happy 4th of July' and not 'Happy Independence Day'!

While the blog-sphere has vast variety of recipes flooding most spaces with the symbolic red and blue colors of the American national flag, I set out to bake some red and blue berry dotted muffins as a tribute to this tradition. My plans to bake Blueberry Raspberry Muffins toppled when I realized I was out of stock on Raspberries and was in no mood to rush out early in the morning. Nevertheless, these Blueberry Muffins were made and devoured for our breakfast, just the American way.

Blueberries


Blueberry Muffins

INGREDIENTS

3/4 cup all purpose flour + 1 tbsp to toss blueberries into
1/2 tsp. baking soda
1 tsp. baking powder
1/8 tsp. salt
1/2 cup sugar
1/4 cup vegetable oil
1 small egg (If using a large egg, suggest to use 1/2 an egg)
1/2 cup yogurt
3/4 cup fresh blueberries

DIRECTIONS

Preheat oven to 380 degrees F.

In a large bowl sift together the flour, baking soda, baking powder, and salt and set aside. Separately toss the blueberries with a tbsp of all purpose flour and set aside.

In another large bowl, whisk together the sugar, oil, egg and yogurt. Add the dry ingredients into the wet and stir the mixture gently using a wooden spoon in figure 8 motion. Add the blueberries to mixture, stir them in, reserving a handful of blueberries to be topped on the muffins.

Scoop the mixture to muffin cups and fill up to three quarters. Sprinkle the remaining berries on top of muffins and poke down lightly. Bake for 20 to 25 minutes, rotating pan halfway through. Remove from oven and turn out, and allow to cool completely. Serve warm or store in airtight container for 2 to 3 days.

Blueberry Muffins_2

Chewy Fudge Brownies


Life beats a charming rhythm when you uncork it from its mundanes. It sings a different chime when you whisk away from the regular. Our weekend went by, but it was nothing like the usual. Before it flipped over to Saturday, we headed out of city for three solid days of fun and adventure to a place we had little known or expected it to be. Well, two and half, if I have to be precise. North Conway it is known, a lovely little destination for home-lost adventurers like us. There's so much around there for every season that a couple of excuses to go back there again may not seem enough. Tucked in sheer wilderness under the bellies of New Hampshire, here's where every vacation can be an inspiration to another one.

As the roads wind up to the city of North Conway, the scenes change. Its urban at the face of it, yet cleverly rural. There are malls, restaurants and ad banners everywhere. Yet, as you drive up the northern hemisphere, the mountain peaks play a peek a boo at every tide of the road. There's a cast of green spell in all shades, a submission to nature, with breath taking views that make you wanderlust. It makes you twisted in tongue and in loss of words.

Chewy Fudge Brownies Prep


We went camping in a group of ten, living life in tents and sleeping bags, holding lanterns to cook food on the grill, sitting by the fire and toasting up s'mores, curling up the feet to bare the chilly nights and seeing starry constellations in inky-black skies. And that makes you forget the clock and the cameras too! For the first time ever, we took our SLR out on a trip and came home without shooting any on it. Its hard for me to swallow that.

New Hampshire does that to you. You get to live what you don't see everyday. Many choose to stretch their lazy bones on the sand, either batting their eyelids and soaking up some sun or, flipping a book. But, we went tubing along the river shores where the loons nest. We let the sun shine on our backs. We wallowed and waded through knee deep waters, where the sand and stones make you wiggle your toes and the sun seeps skin deep to stimulate melanin. We ventured into woods and echoed tweets of finches too.

Its the kind of place that makes you want to wake up early to chirping birds and stay up late to the sounds of cicadas. It doesn't matter what hour of the day you are stepping into. There always seems a pause. Where the only other sounds are either the ripples of the meandering Saco river, the sway of tall ferns and chirping of finches. That was our home for those two odd days, all well lived.

Chewy Fudge Brownies Cut


When the sun went down to take its customary daily dip, we warmed ourselves by the fire, lit up the grill and ate Quesadillas, Corn on the Cob and drank Sparkling Fruit Mocktails. Brownies followed for the dessert. I baked these Brownies in the morning we left out and took them along for those camping dinner treats. They are wonderful to share in a group where splurging on good food can never seem enough, more so when you are in a gang of ten odd folks who enjoy good food and hearty laughs!

These Brownies are one bowl and simple to make. They are a cross between fudgy and cake-like. While they don't slop, they are intensely chocolaty and rich, much fudge like. They have crackling tops which make them look beautiful. And, no Brownie is good without generous scatter of walnuts. I promise you will love them, as much we all did.

Chewy Fudge Brownies Bites


Chewy Fudge Brownies

INGREDIENTS

1/2 cup of unsalted butter, softened at room temperature
1 1/4 cup of bittersweet chocolate
1 cups of granulated sugar
1/4 tsp of salt
2 eggs
1 cup of plain flour
1 tbsp of cacao powder
1/2 tsp of instant espresso coffee powder
1/2 cup of broken walnuts

DIRECTIONS

Preheat the oven to 350 degrees. Prepare a 9x9” square baking pan by lining it with parchment paper. I like to let the edges of the paper hang up a bit on the sides to make it easy for the removal.

In a large saucepan, melt the butter. Add the chocolate chips and melt them over medium low heat. Once melted remove from heat. Alternatively, you can microwave the butter and chocolate chip on high heat for 1 min. Allow it to rest for 2 mins, then add the sugar, eggs, flour, cacao powder, espresso powder, salt and broken walnuts into the melted chocolate butter mixture. Whisk well together. Spread the batter evenly in the prepared pan, leveling the tops. Bake them for 35-40 minutes. Test by inserting a skewer at the center. The skewer will have flecks, however there should be no wet batter coming out of the baked brownies. Allow them to cool completely and then slice into squares before serving.

Chewy Fudge Brownies Stacked


Notes:

I've used cacao powder here. However, you may use cocoa powder and up the quantity to 2 tbsp. Cacao is stronger than cocoa powder, hence you will require more cocoa powder, if being used.

Banana Cardamom Muffins_1


Over the past 2 months that we have been here in the US, I have baked only once. And that was when these Banana Cardamom Muffins were made, much on demand by my husband. While banana bakes don't make it to the list my top favorites, I love baking with them and I am now slowly getting closer to loving and appreciating them too. I have come to appreciate the way bananas lend an inherent sweetness to a dish and that helps to reduce the overall amount of sugar. And this one certainly did!

Banana Cardamom Muffins_batter


It seems ages since I whipped butter with sugar or whisked batter to make good ol' cakes. On our visit to the States last year, I splurged on baking and took advantage of the large convection oven that the homes here are bestowed with. This time around I made a conscious decision to stay away from baking a ton to avoid all that sugar overload.

Banana Cardamom Muffins_tray


I cannot possibly imagine a home that does not stock bananas. Its such an easy takeaway fruit with easy-peasy peeling and no de-seeding. So clean, mess free, hassle free and completely satisfying to a sweet tooth!

We get panic attacks at home when we run out of them! Seriously!

Banana Cardamom Muffins_2


I believe every blogger should have a repertoire that boasts of a couple of recipes starring 'the bananas'. Cakes and muffins take the lead here. A banana muffin is the easiest bake you can ever put together and there are little chances that you will go wrong. It replaces egg with utmost ease adding loads of flavor. And it hardly matters how its flavored additionally. It could either be the classic vanilla scented or chocolate studded or just none at all! Either ways, they all taste delicious. Bananas sing by themselves. They have a characteristic sweet flavor of their own. So should you leave them by themselves, they will yet shine. May be a kick of aromatic spices will add bounce to them.

Banana Cardamom Muffins_3


These muffins were made on a lazy afternoon to go along with our evening cup of tea. As I set out the muffin liners and put the batter together, I realized that my pantry had run out of stock for vanilla extract. A BIG sin for any baker, I guess! But here's where traditions come to rescue. Our by-gone generations have sworn by the fact that bananas and cardamoms make a match in heaven. And I cannot deny that! We have grown up eating desserts and sweetmeats made from bananas heavily scented with cardamoms. So, when these muffins were made, they swept our home with warm, mellow headiness from cardamoms, the jaggery and bananas, making these undeniably irresistible to wait till they cooled. Couple of them were downed warm right as they were out of the oven. These muffins certainly make a lovely tea time treat. They are wonderful to carry out on picnics and long drives.

As for me, they brought back warm fuzzy memories of home and my mother's kitchen where the pairing of bananas and cardamom ruled the roost on many occasions.

Banana Cardamom Muffins_4


Banana Cardamom Muffins (Eggless, Vegan adaptable)

Yields 9 large muffins

INGREDIENTS

1/2 cup mashed bananas (about 1 large over ripe banana)
1/2 cup milk (replace with soy milk / nut milk of your choice for vegan option)
1/4 cup vegetable oil
1 cup all-purpose flour
1/4 cup powdered jaggery (packed)
1/4 cup fine sugar
1 teaspoon baking soda
1 teaspoon fresh cardamom powder
Handful of chopped walnuts and raisins

DIRECTIONS

Preheat oven to 350ºF/180ºC. Line the muffin tin with paper cases.

Mash bananas along with milk, jaggery and sugar in a food processor. To this, add vegetable oil and whisk well. Set aside.

In a separate glass bowl, sift the all-purpose flour and fresh cardamom powder along with baking soda.

Make a well in center of sifted flours. Add the wet mixture to the dry ingredients. Fold gently. Few lumps are perfectly okay, but do not over beat. Finally fold in the walnuts and raisins. The batter should be thicker than the regular cake batter.

Scoop out spoonful of the muffin batter and dollop them into the lined muffin tins. Scatter a handful of walnuts and raisins. Bake for 25 minutes at 180ºC or until a skewer comes out clean. Allow to cool before removing from pan.

Banana Cardamom Muffins_5