Showing posts with label Gluten-free. Show all posts

Batata Poha

How to make Aloo Poha | Batata Poha Recipe
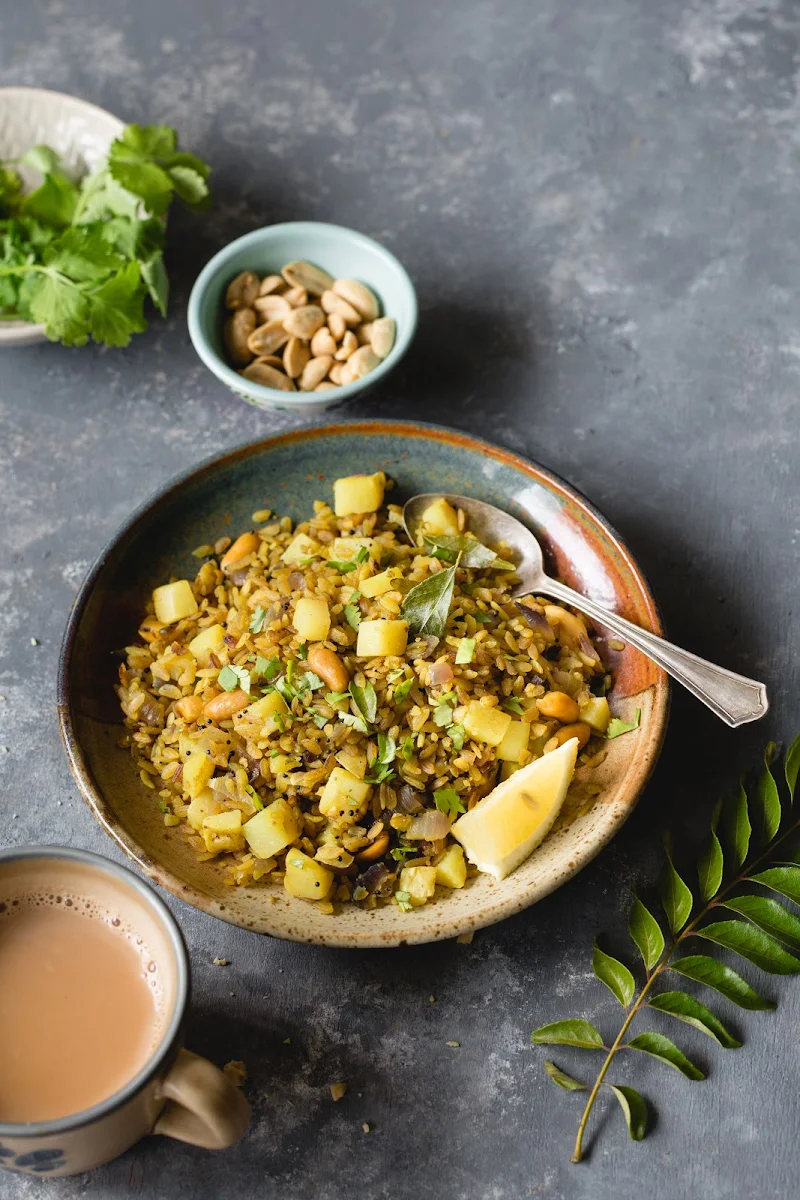
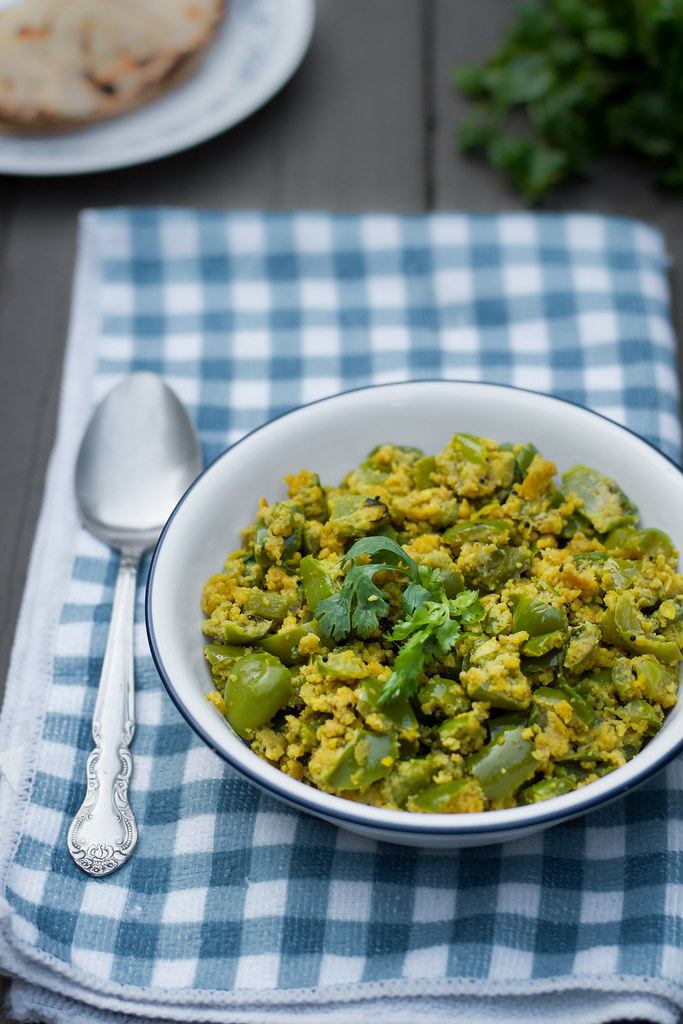
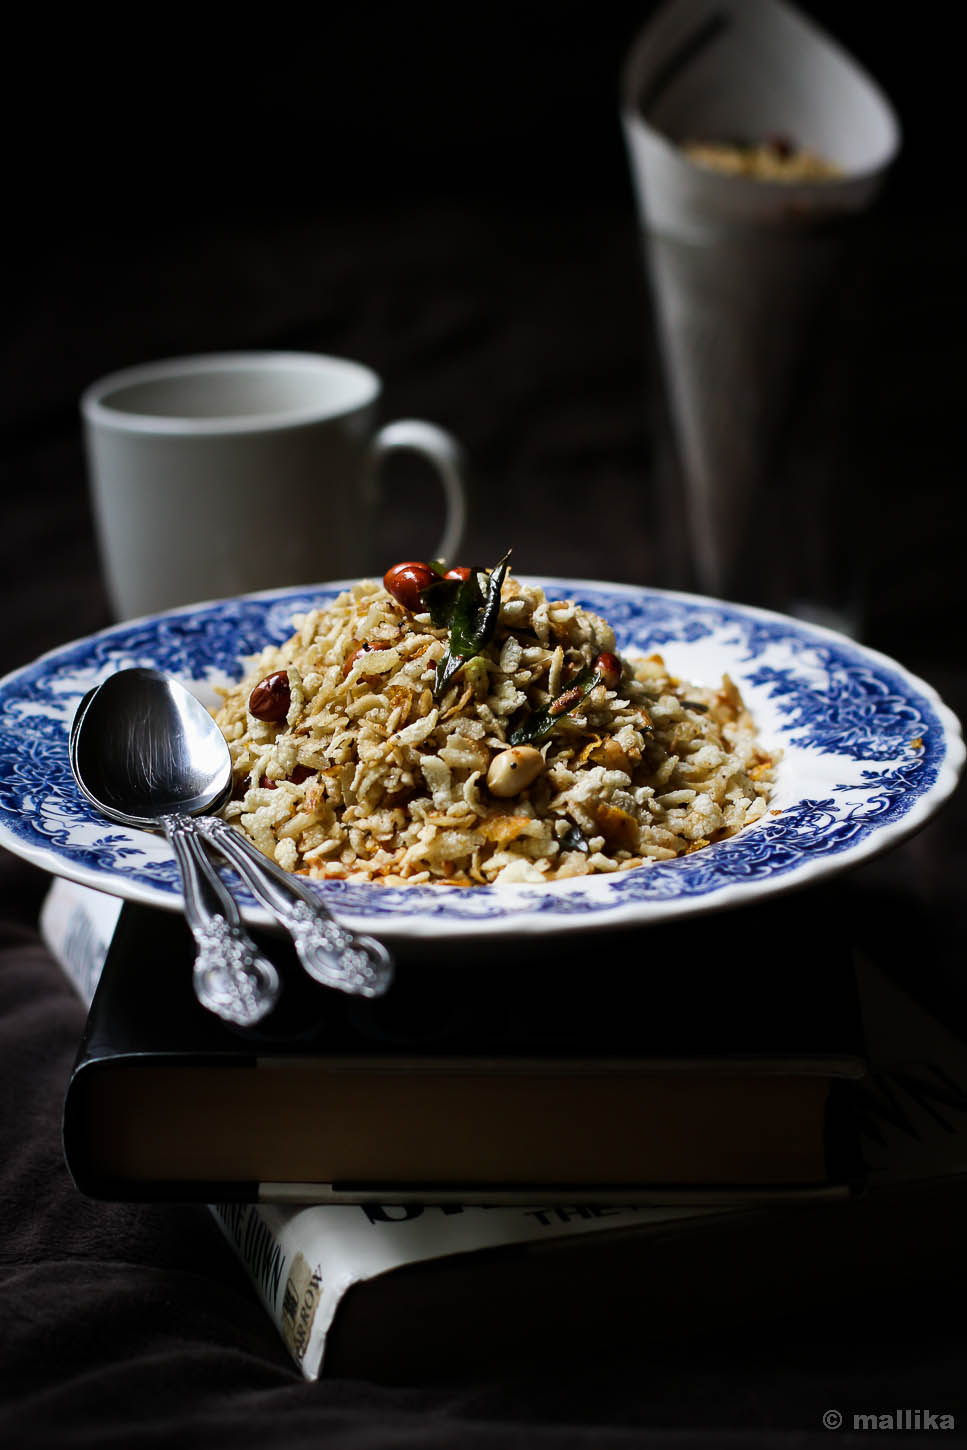
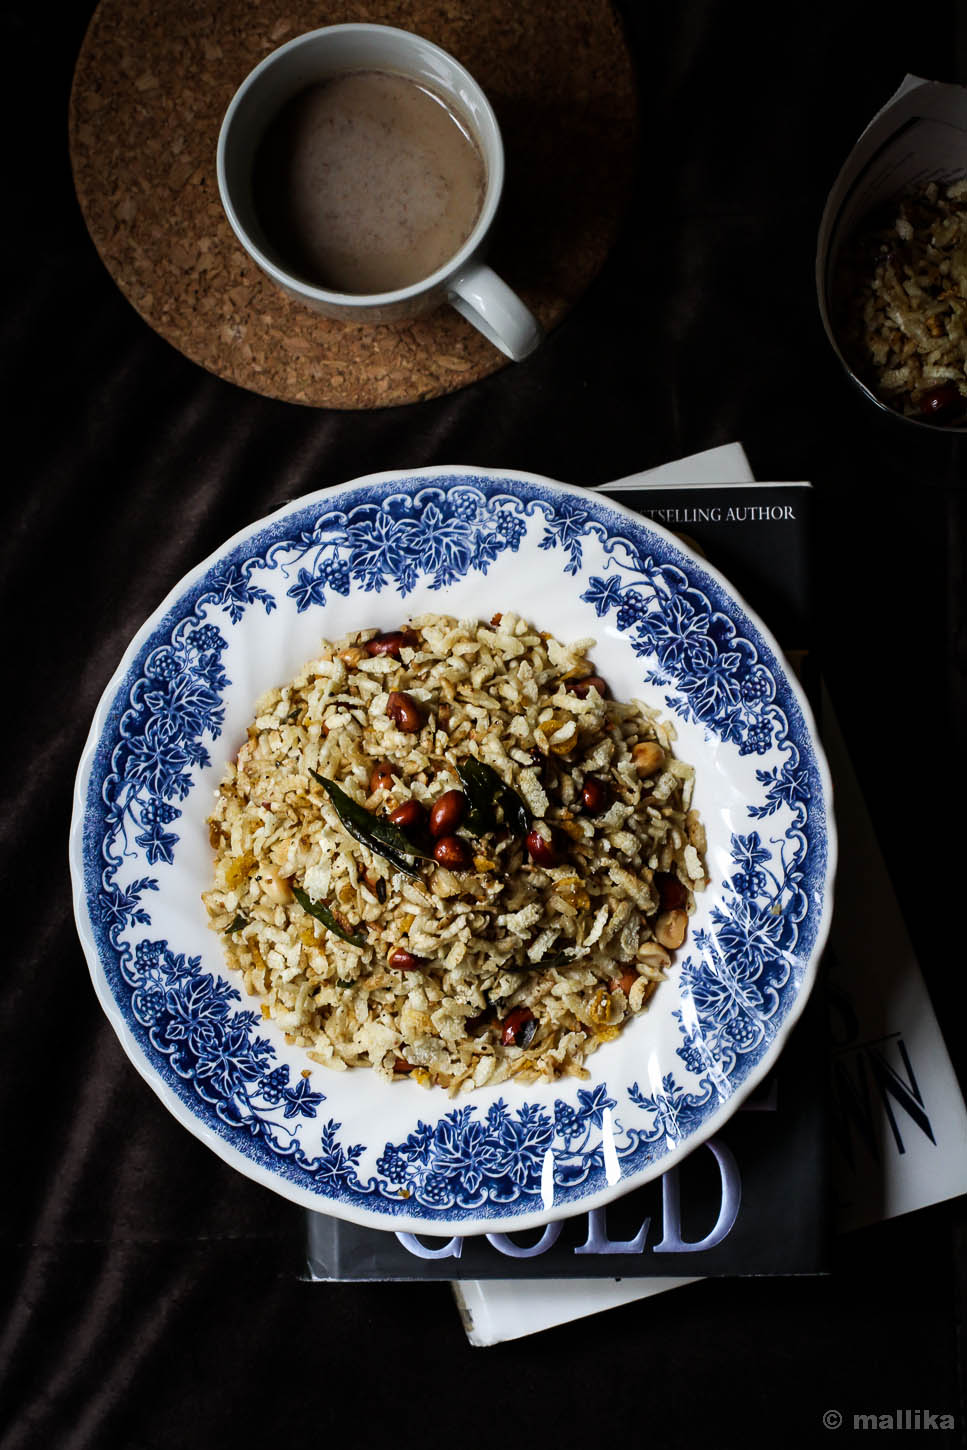
Batata Poha is a very popular breakfast dish from Maharashtra made with onions, potatoes (batata) and beaten rice (poha). Poha is a common breakfast dish made across India, with each state having its own subtle variation and names. There are numerous recipes for making poha, the recipes varying from one family to another, each with their own way of preparing it.

Kanda Poha and Batata Poha were made regularly at home. Karnataka has it's own variation called Avalakkibath which is quite similar to Kanda Poha, but has the addition of urad dal and channa dal in it, with garnishes of fresh grated coconut. Batata Poha though was always called as Batata Poha, and never Avalakki. Mornings with plate full of Poha, tall glass of warm milk and off we went to school full and nourished till noon.

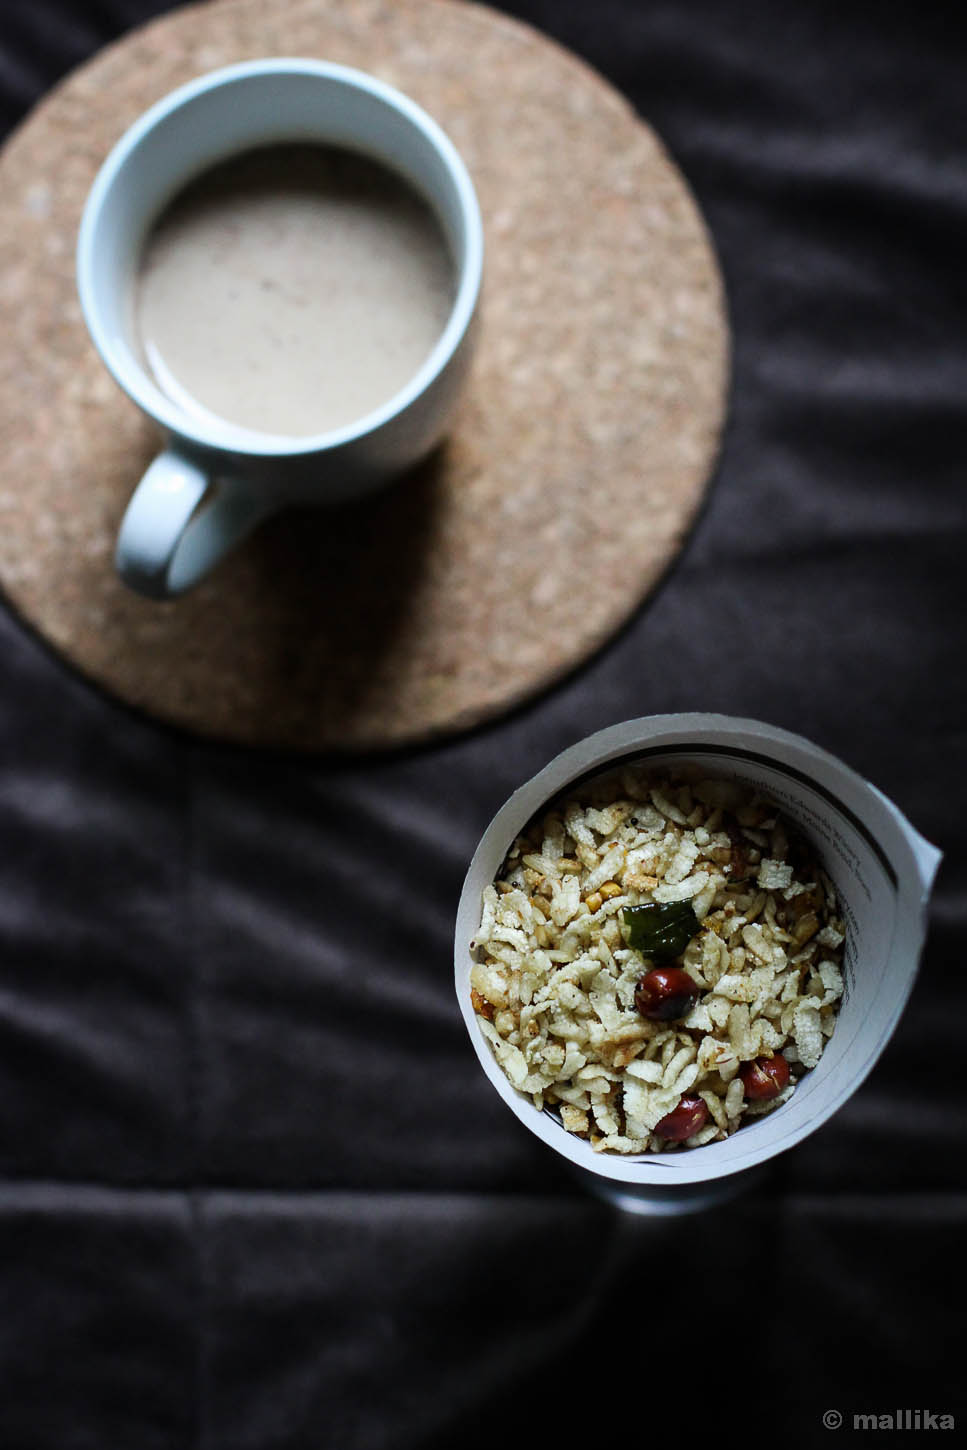
This was also a breakfast made when we had guests over, or on days when mom was running out of time to prepare breakfast. Potato, in general is a loved ingredient by many, so that meant less fuss. I now make this Maharashtrian-styled Aloo Poha / Batata Poha regularly at my home and my family enjoys it well as much as I do.

Batata Poha


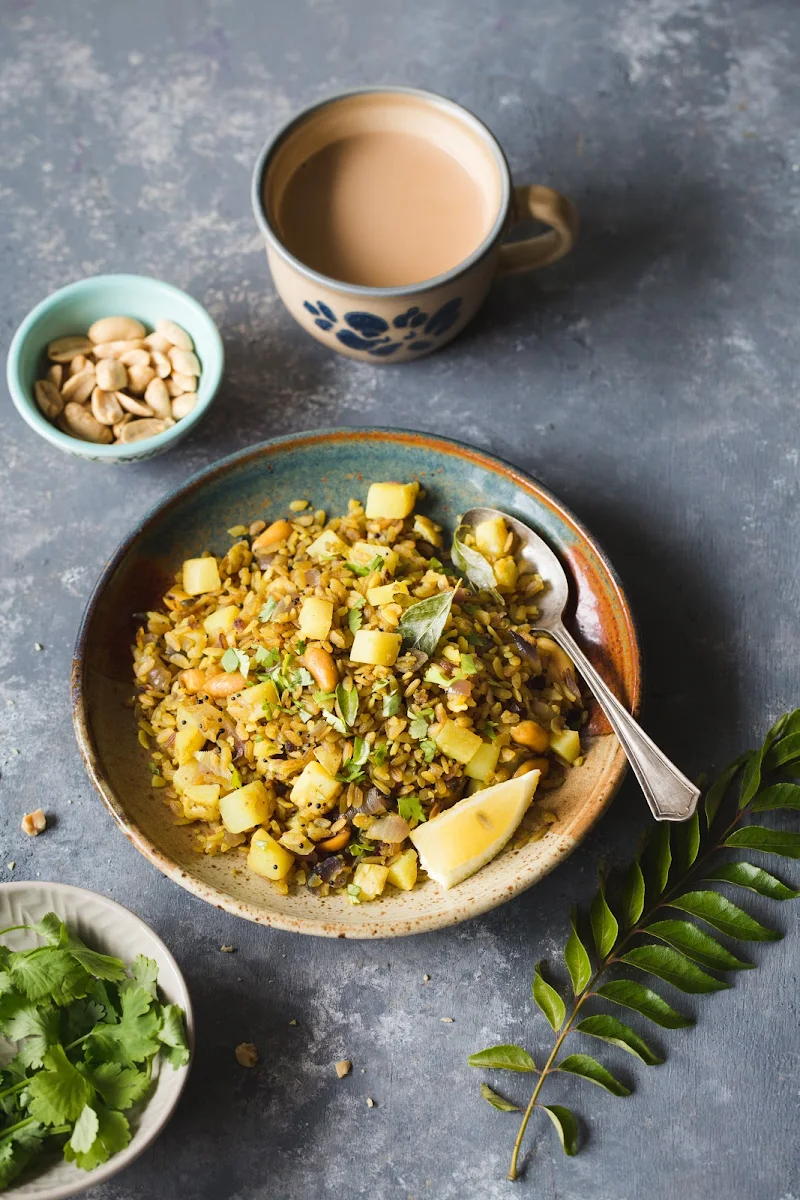
Batata Poha | Aloo Poha

INGREDIENTS

2 medium sized potatoes, peeled, chopped and diced
2 cups poha/beaten rice (thick variety)
2 tbsp oil
1 tsp turmeric powder
1 tsp mustard seeds
1 sprig curry leaves
2 green chillies, finely chopped
1/2 cup chopped onion
1 tbsp roasted peanuts
Salt to taste
1 tsp sugar
Juice squeezed from 1 lime
Fresh coriander leaves to garnish

DIRECTIONS

Wash the beaten rice thoroughly and drain the water. Add turmeric powder and salt, mix well and keep aside. While the poha blooms, proceed to prep the rest of the ingredients such a chopping potatoes and onions.

Heat oil in a fry pan, add in the mustard seed and let it splutter. Add the chopped onions and stir fry for 30 seconds till they are transclucent in color. Next add the diced potatoes, torn curry leaves and green chillies. Stir fry for a couple of minutes till the potatoes are cooked, yet have a bite. Add in the soaked poha/beaten rice. Turn heat to medium low and gently mix all the ingredients. Cover and cook for atleast 5 mins. Once cooked, remove from heat, add sugar and squeeze juice from 1 lime. Garnish with roasted peanuts and chopped coriander leaves.

You can cut down the cooking time by using boiled potatoes before hand. You can add the potatoes into the tempering oil, stir-fry well and allow it to cook. That way the potatoes get a slight crunch. This however takes a longer time and consumes more oil, hence I avoid this version. The one that I make is a quick, healthy and less time consuming since the potatoes are pre-boiled and need no further cooking. Addition of a teaspoon of sugar and lime is optional, but this really adds an edgy flavor, which is typical to Maharastrian cuisine.

An alternate version of this called Kanda Poha, where onions are used instead of potatoes is quite a common breakfast. This breakfast is not just simple and healthy, but also filling to keep you going for long.

Kanda Batata Poha


*This post was updated and republished recently.*

Mushroom Makhani

How to make Mushroom Makhani | Easy Mushroom Makhani Recipe
It was in brief period of time, sometime in June last year when spring was fading out unhurriedly, giving itself into the summer warmth, and the temperatures were just about steadily poised in their pleasant 60s, that I felt a sudden urge, an unfounded obsession over mushrooms. I had no idea what triggered it. I must have been under the weather, or must be the sight of damp mulch springing off paunchy shoots while the mist shroud in, or may be the birthday party I attended late spring where stuffed baked mushroom caps was all I ate because it was beyond delicious and I could barely take it off my mind for several days after the party. I'd go out for walks and randomly sight odd pairs of mushrooms sprung on peat soil and tree trunks, watch them in awe, and strike a sudden temptation to cuddle my hands around a bowl of warm mushroom soup. In my strong desire to savor them, I toyed the idea of cooking them for all three meals a day, crooning over mushrooms on toast for breakfast, mushroom biryani for lunch and this mushroom makhani for dinner. I had the fortune of sparing my family to bear this marathon brunt of mine as they were summer vacationing back in India, visiting relatives and friends and enjoying the glorious ripe seasonal mangoes in kilos, while I boggled silly over these fungi. Insane you may have called me, had you sneaked into my lunch box, or my dinner plate that week, that, my meals were inadvertently smeared with mushrooms in their ensemble. I would visualize them in my shopping for groceries - the buttons, shiitakes, oysters, portobellos everywhere. Umbrella caps in supple tones of milk and tans - some pumped up, some stout, others squat, and shaggy, unkempt in their mannerisms, their piggy stems ballooned underneath, their tender skins crust with dirt and mire that needed gentle strokes in water bath to glisten their starkness, leaving their glamorous gills unhurt on the underside of their caps. None the less glorious in all forms.

Mushrooms


After marking a day on calendar and striking it off with meals rigged with mushrooms, I was out and about that obsession for a while, staying away from aisles at grocery stores, thinking beyond its capacity. I relieved this obsession, so glad at it; its yearning so deep and willingly conspiring, much like echoing phrases from Paulo Coelho's The Alchemist, "When you want something, all the universe conspires in helping you to achieve it." I conspired it. I achieved it.

Makhani Masala


Much of this recipe I share today is a remake of my recipe for Paneer Makhani, so you make the makhani gravy ahead of time and prepare the actual curry just before serving. The makhani gravy is sinfully delicious on it own, but when you throw in mushrooms, they take on a new level of deliciousness. The meaty texture of mushrooms complement the creamy gravy, giving it depth of flavors. This rich dish is fit for parties and celebratory occasions, but if you want to give yourself a break from mundane home cooking and serve up some exoticism on weekends for your family, then this be it.

Mushroom Makhani


Mushroom Makhani

INGREDIENTS

1 cup of prepared Makhani Masala (refer here)
200 grams button mushrooms
1/4 cup cream (adjust to your taste)
1/2 tsp. of kasuri methi or dried fenugreek leaves
Fresh coriander, cream for garnish

DIRECTIONS

Prepare the Makhani masala as in recipe mentioned here. It should yield approximately about a cup of thick gravy.

In case you are using refrigerated or frozen gravy, remove from the fridge and allow it to come to room temperature. Add 1/2 cup water and bring it to a simmer.

If you have prepared the gravy masala fresh, then to the simmering gravy, add 1/2 cup of water and diced mushrooms and bring it to a boil. Stir and cook covered for 10 minutes. Once the mushrooms are cooked, add the cream and simmer for 2 minutes. Transfer the Mushroom Makhani to a serving bowl and garnish with more fresh cream, ginger juliannes and coriander leaves. Serve hot with rotis, naans or kulchas.

Mushroom Makhani

Carrot Soup

How to make Easy Carrot Saaru, Easy Carrot Soup
All through the fall, I stocked pumpkins at home in sheer keenness to make a good pumpkin soup that I could share with you all. I was amused, delighted beyond words to watch pumpkins everywhere, on market stands and home fronts, in malls and on window sills, on blog feeds and in ad mailers. Our favorite grocery stores smelled warm from pumpkin spices and its produce. Our office had spice infused fresheners in the lobby to welcome guests. The coffee was not spared either, flavored with pumpkin spice in it too! Tell me, who wouldn't be lured? So each time we stepped out grocery shopping, along came a pumpkin or its sibling in form a squash, that made its way into our shopping cart, judiciously sized to suit two meals for us as a family.

On a seasonal high note, I did make soups and stews, and plenty at that, laboriously skinning the peels, slicing and dicing them, and boiling them to pulp over pot of stock. I choose not to bake, rather simmer over a pot on stove, as that's a task I like to leave for days far less busier than weekdays, when I don't have the time to worry about our over-sensitive fire alarm screeching off at the slightest variation of warm air emanating from the oven. That's another story to say. The soups though did turn out creamy, and deliciously vegan, not necessarily warranting any fat or cream in regard to heighten the flavors or their sumptuousness. But they got gulped down faster than I expected, hot and steaming, ladles after ladles, cold fingers wrapped around the warm bowl for comfort, either dunked by toasted garlic bread or tossed along with piping hot rice, savored snugly in our warm dining area while the leaves were busy shedding under the seasonal transition.

Carrot Saaru


It happened so, that each time I planned a soup, I was swooned by the dire beauty of the squash and pumpkins, that I shot several preps of them much ahead of sunset in the noon. By the time the squash was sliced and diced, cooked, pureed and boiled to perfection, finally seasoned to be served, it was time sun called his day and the darkness overcast the late noons in its thick black bile. I finally gave up on presenting my super-creamy-vegan-butternut-squash-soup here, instead, the year end holiday baking mania took over the house bringing more cheer to otherwise gloomy noons.

We've step foot into the new year, and I've welcomed it with my arms wide open. I have no resolutions that pound my mind hard, so there's none really to make. But I realize this blog is devoid of soups and I want to fill that space. I need to make a beginning, and here's one that fills the bill so well. Apt in time, a recipe for a good Indian soup in the beginning of a new year. It can't get better than this.

I pray this year croons high hopes, brings truck loads of good luck, fab health and immense happiness, and heaps of enthusiasm to live the year ahead positively. I should have been rolling in trays of sweets or brought a dessert along here, commemorating the new year and reminiscing 'oh whatta year 2016 was for me!', because it was gratifying in good sense, and worthily etched into our memory with a fair balance of highs and lows, but instead, I have come along with bowls of warm and comforting homemade carrot soup that clamors itself so South Indian. This is what makes me the happiest - simplicity in a bowl. It defines what I would love my year to look like - simple, clean, uncluttered and subtle in my living and approach.

Carrot Rasam


Carrot Saaru | Carrot Rasam | Indian Carrot Soup

Prep Time: 15 mins | Cooking Time: 15 mins | Serves 4

INGREDIENTS

2 carrots, chopped
2 cups water
1 tbsp. tamarind paste
1 tsp. sambhar powder
1/2 tsp. turmeric powder
Salt to taste

For Tempering:

2 tsp. oil
1 tsp. mustard seeds
1/2 tsp. asafoetida powder
1 sprig of curry leaf
1-2 whole red chillies torn

DIRECTIONS

Boil the chopped carrots along with 2 cups of water and turmeric powder until they are fork tender. I pressure cook them on 2 whistles as its quicker to do so. You can pan boil it if you do not have a pressure cooker. Once done, allow it to cool and blend it to a puree in a mixer.

Transfer the carrot puree into a thick bottom pan. Stir in the tamarind paste, salt and sambhar powder. Add additional water to adjust the consistency of the saaru / soup. I like to have this saaru slightly thicker than our traditional rasams as it brings out the texture and flavor of carrots well. Bring the saaru to a rolling boil and then simmer for about 2-3 minutes. Turn off the flame and set aside to temper.

To temper, heat oil in a small pan. Add mustard seeds and allow it to splutter. Add the asafoetida powder, torn red chillies and curry leaves and fry briefly for few seconds. Turn off the flame and add this to the prepared saaru. Serve hot with steamed rice or drink them steaming hot right out of soup bowls.

Carrot Soup


How to make Healthy Raw Brownies | Easy Raw Brownie Recipe
Be thankful for what you have; you'll end up having more. If you concentrate on what you don't have, you will never, ever have enough. - Oprah Winfrey

Its Thanksgiving tomorrow and under five weeks, we'll be well into Christmas, my favorite time of the year when all else goes still and only food and festivities shall prevail. I am excited and am so looking forward to it. As for now, there isn't a grand event of celebration lined up for tomorrow, but, we'll take joy in the holiday to follow, time for togetherness and bonding over relaxed morning, lazying noon and a slow evening. Hurray to no work, no deadlines, no meetings for a day. We'll wake up late in the bed, follow a laid back routine and lavish a little on a good homemade breakfast. The day calls for my time in kitchen, where get to I play with pots and pans, may be tossing up some flour, butter and sugary goodness into a ton of fruits to come up with something worthy for Christmas. A cake is in store, a Christmas fruit cake that I can hopefully talk about in posts to come. We'll have our family at the table, the three of us, savoring lunch in an austere way, which in itself is a small celebration to do on a weekday - bringing in tit-bits of our weekend-ness, in a little modish way.


Meanwhile, I have these super healthy brownie treats for you to feature on your Thanksgiving table. I made them this summer, though they don't pertain to any seasons. They are treats you can make year round. No seasons attached. You can make them for your Thanksgiving dessert menu or keep them handy to treat your guests over a cup of coffee or just carry them on your hiking trip to give you adrenaline boost. There's no sugar in them, no butter whatsoever, no flour, no guilt too. And no no! I am not on diet if you ask so. But I thought I should be a little considerate and save you from splurging way too much before the year end celebrations kick in. There's a lot awaiting there, Christmas on its way, New Year dinner to follow, so you may want to treat yourself slowly and sanely before getting there. These little treats don't steal away the joy of splurging, mind you. They are delicious as is in small bites or you can make them in a wonderful no-bake pie base with fancy toppings. Hope these make your Thanksgiving table a little more glamorous.


Raw Brownies

Prep Time: 5 mins | Pulse Time: 10 mins + 2 hrs refrigeration | Yield: 12 pieces

INGREDIENTS

2 cups of medjool dates
1/2 cup of roasted almonds
1/2 cup of raw walnuts
3 tablespoons of raw cacao powder
2 tablespoons of maple syrup

DIRECTIONS

Blend the almonds and walnuts in a food processor until they form a crumbly mixture. Then add the dates and blend again till dates are pureed. Next add the cacao and maple syrup and blend again. The mixture will come together in form of a dough. If its wet to handle, add in some walnuts and pulse again.

Place the mixture into a baking tray. Refrigerate for two hours or freeze for one hour so that it sets well. Cut into slices and serve. Store in an air tight container and keep them refridgerated for freshness.


Pecan, Cranberry, Coconut Granola_1

How to make Pecan, Cranberry and Coconut Granola | Easy Granola Recipe
Another year has arrived and in less than an hour 2015 will be gone. All gone, like vapors transpiring into thin air till there’s none you can see. I see and feel those last few minutes transpire as I sit down to put this post together. The calendar ticked away without notice. Days rolled into nights, snapped to weeks, cascaded till they sprinted into all 12 months. And finally, in a few hours from now we will gallop into the finishing line, calling it a year. A year that will be gone forever. For me, this was faster than anything I have known. Faster than the blink of an eye. Faster than the speed of lightening. Faster than the fastest I know.

Granola prebake Granola


My jaws dropped at the crack of this dawn in a sudden realization that something worthy is going away forever. A year made up of 365 well-meaning days. Either you’ve made the best of it or wasted it. There are days that made you laugh hard or the ones that had your faces dug into pillows and weep into nights. If you are like me, you would assume you've hung in neither ends of extremes. The year came and passed by with good measure of mighty highs and lows, in a sweet sour concoction, like biting into a digestive candy that gives you a balanced taste in bits of everything - sweet, salt, spicy and tangy. Though I am unable to concur what it has been sort of, it sure has been a mixed bag of emotions. It makes you think. It worries you. It brings you hope, dreams and aspirations plenty that paves way into welcoming the new year with wide arms. While 2015 has been generous and giving, etching many memorable moments that evoke nostalgia, I’m also thankful for it giving the greater positivity & strength to face the welcoming of the new year.

Pecan, Cranberry, Coconut Granola Served


So let this year come on us. I wish it brings large measures of health, happiness, and prosperity for all. I pray it brings peace on earth. Peace in minds, at heart, in relations, with neighbors, friends, nations and across the globe. Irrespective of what race we belong to, let love be unbiased by color, united by humanity and progressive by nature. I wish your moments are filled with joy, laughter, trust, immense love and happiness. Happy New Year to each one of you for a fantastic 2016 and wishing you have greater prosperity & fortunes to the extent that it increases in great leaps and bounds for this new leap year!!

As I bid adieu to the year gone by and welcome the new year, I share with you a recipe for this Pecan, Cranberry and Coconut Granola that is just the perfect way start the first day of the year with. With the festivities and the week long celebrations gone by, lets make new beginnings with a fulfilling breakfast to treat our families to. Here's a recipe promising ease and health together with home made joy at breakfast table for your family.

Pecan, Cranberry, Coconut Granola Plated


Pecan, Cranberry and Coconut Granola

INGREDIENTS

2 cups instant oats (old fashioned oats preferred)
1/2 cup shredded dry coconut
1/4 cup dried cranberries
1/4 cup broken pecans
1/2 cup maple syrup (or honey)
1/2 cup coconut oil

DIRECTIONS

In a clean bowl, combine oats along with dry coconut, cranberries and pecan nuts. Drizzle the vegetable oil and maple syrup and toss well.

Bake in a pre-heated oven for 30 minutes at 180 deg C till the oats begin to turn golden brown, tossing them once in every 10 minutes to ensure even cooking.

Remove and allow to cool completely before storing them in a clean dry container. Serve with warm or cold milk.

Pecan, Cranberry, Coconut Granola

Besanwali Simla Mirch

How to make Besan wali Simla Mirch | Simla Mirch ki Subzi | Capsicum Recipe
When the weather plunged low, it brought along bouts of cold, incessant sneezing and coughs that plagued our home. We fell sick in a row, taking turns to seize the bed and blanket. The bedside table saw our favorite magazines being replaced with a spread of ayurvedic tonics, amrutanjan and all kinds of inhalers for the most desired relief. What good were those magazines when our eyes threatened to water in a stream and our nose constantly bled phlegm? It seemed like a trending viral infection as each of us made our way in and out of the bed, and nearly all of whom I knew were suffering the way I did. I nearly survived each day of that heavy headiness with glasses of warm water, hot kashaayas and dozens of handkerchiefs by my side. Days have finally passed by, recuperating and feeling much better, apparently much slower than we had liked. Coughing and sneezing are showing signs of receding, though the chest is still heavy with congestion. I hate fighting the dreaded infection, but alas!

On my way to recovery, with spurs of intermittent coughs and an inhaler constantly plugged into my nostrils, I am back to blogging with this recipe for Besan wali Simla Mirch that has been my favorite for long. I have been looking forward to share this with you for a while, however each time we make it, it's wiped clean till the last bit. It was hard to save this portion for this post! That gives you an idea of how much we love it. It's a simple dish where green bell peppers are paired with roasted gram flour and other spices bringing out amazing flavors. On days when I am time pressed to make a simple dal to pair along, this recipe comes a savior as it takes care of both the vegetable and dal in a single dish. We usually serve this as a side dish for chapatis / phulkas along with salads. I hope you enjoy it as much as we do.

Besanwali Simla Mirch 1


Besan wali Simla Mirch

INGREDIENTS

1/2 cup gram flour / besan
3 medium sized capsicums, diced
1 inch Ginger, grated
1 tbsp. Oil
1 tsp. Mustard seeds
1 tsp. Red chili powder
1 tbsp. Coriander powder
1 tsp. Turmeric powder
3-4 tsp. Water
A generous pinch of asafoetida (hing)
1 tsp. sugar
Salt to taste

DIRECTIONS

In a wide mouthed pan, dry roast the gram flour (besan) it till it changes color slightly. The flour should smell fragrant as it is being roasted. Remove from the pan and set aside to cool.

Heat oil in a pan. Add mustard seeds and fry till the seeds crackle. Add hing and chopped ginger and fry for a minute. Then add the diced capsicum along with turmeric powder and saute it for few minutes till it's cooked, yet has a nice crunch. Add chilli powder, coriander powder, salt and sugar to taste and saute further on a low flame.

Add the roasted gram flour, sprinkling a couple of teaspoons of water into it. Cook on low flame for 10 mins. Transfer to a serving dish and garnish with coriander leaves. Serve hot with rotis or as sides with steaming hot rice.

Poha Chiwda

How to make Poha Chiwda | Avalakki Chiwda | Namkeen | Indian Snacks
With a vacation gone by, now that I am back in India, kind of jostled into a routine, placed our daughter in school and have resumed work full time, you would probably expect this to be sort of a travelogue post walking you though dozens of photographs from places far known and unknown, painting a picturesque comprehension for each. Let me put all guesses to rest. I may have been back here, but my mind is still in the roving. It wanders back and forth to the good time we spent with D. I would love to do a short walk through of the places we visited, which was in plenty. We spent good moments doing things together in threesome, but I feel simply unwilling to dig into those photographs and bring those moments into words here. Some things are best left that way. Imprinted in memories. When mere words cannot do justice.

Poha Chiwda


So as it goes, this is no travelogue kind-a post, but a recipe for an Indian savory snack I made in huge batches during our time in the US. We savored it by bowls on several evenings sitting by the wooden porch that overlooked the thick woods in our backyard. The moments slipped away without notice as we sipped into hot chocolate and tea, scooping spoonfuls of chivda into our palms, slowly savoring its crunch, while we tended to the young tomato plants that bloomed tender yellow buds in our garden.

On weekdays when D was away at work, the chivda became my sole savior as I flipped through light reads under the wraps of summer and streaks of golden sunlight. As the afternoons tranced into early evenings, there were days when our little girl kept herself busy dressing up her dolls, setting up the table and putting up a pretend birthday party for them. I would briefly give her company in the initial part of the play, pretending to be her helper, then, slowly whisk away to make time for myself, to play with real pots and pans in my kitchen that belonged to me.

Then, there were other days when she would get busy soaking up her fingers and clothes in spectrum of colors as Elsa and Sofia got painted in colorful attire in a way only she would fantasize. Their frills and veils were painted in reds, greens, blues, browns and whatnot, smudged in uneven tones and stressed outside the lines meant to define these beautiful damsels. That's the time I borrowed for myself in the kitchen, to dish out some delectable savory snacks that made us through those evenings till we waited for D to return from work.

Poha Chiwda


This Poha Chivda may remind you of your childhood spent visiting your relatives or friends, or of festivals like Diwali and Navrathri, when aunts brought in bowls of savory snacks served along with piping hot tea. Poha Chivda was and probably is still a common tea time savory dish in many Indian homes, served mid-noon along with tea or coffee, often store-bought and rampantly available in transparent polythene packets in every bakery and grocery store possible. Almost every house probably has had some version of it. At home, we call them all just 'chivda', which simply means an assortment of fried and seasoned ingredients usually with a base of flattened rice or cornflakes. Chivdas come in varieties, but there is no hard and fast rule on how you wish to make and what you wish to season them with. The store-bought ones are usually heavily seasoned and spicy, but I like to break rules and keep it simple, light and flavorsome.

My version here is quick with minimal ingredients. Its quite common to use fried cashews, raisins and sesame seeds for a more assorted rich taste. It takes about 15-20 minutes to put all of this together from start to finish. You could use fried whole red chillies instead of red chilli powder to reduce heat further. If you wish to try a low fat version and bake the poha, let me know how it works for you. For once, when I tried a baking attempt at this, it failed miserably. Try this and let me know how you like it.

Poha Chiwda


Poha Chivda | Namkeen Chivda | Avalakki Chiwda | Seasoned Flattened Rice

INGREDIENTS

3 cups poha / flattened rice (use thick variety)
1/2 cup peanuts
1/2 cup roasted gram bengal dal / channa dal / huri kadale
2 sprig curry leaves
1 tsp. oil for tempering
1 tsp mustard seeds
1/4 tsp red chili powder
1 tbsp. sugar or as required
Salt to taste
Oil for deep frying

DIRECTIONS

Heat enough oil for deep frying in a wide mouth pan or kadai or wok. Using a wide mouth strainer or a slotted spoon, deep fry the poha in hot oil. Do this in batches so that you fry them evenly till they swell up and become crisp. Remove and drain over a plate lined with kitchen paper. Fry all of the poha and set aside. Into the same oil, fry the roasted bengal gram dal till its golden brown. Remove and drain again on a kitchen paper. Next, fry the peanuts in this oil till reddish brown in color and drain on a kitchen paper. Fry the curry leaves till they crisp up. Drain and set aside.

Heat a teaspoon of oil in a separate pan. Fry mustard seeds till they pop. Add the red chili powder and mix in all the fried ingredients. Sprinkle sugar and salt to taste. Roast this for 2-3 minutes on a low flame to ensure all the spice, salt and sugar is well combined into the poha mixture. Adjust the spice according to your taste by adding more red chili powder if required.

Allow the chivda mixture cool completely. You can store this in an air-tight container at room temperature for couple of weeks.

Poha Chiwda

Oakleaf Greens Salad

How to make Oakleaf Lettuce with Strawberry Balsamic Salad Dressing
“Dusk is just an illusion because the sun is either above the horizon or below it. And that means that day and night are linked in a way that few things are. There cannot be one without the other yet they cannot exist at the same time. How would it feel I remember wondering to be always together yet far apart?” ― Nicholas Sparks, The Notebook

Nearly a week ago we drove 100 miles away from home and made our way mid-morning through the sultry heat and thick NYC traffic. We reached airport just in time, trying to save every bit of it for the last minute togetherness. We hugged D for one last time, in much of an emotional goodbye this time over the last year. Our little girl is now big enough to understand what separation in true sense means and what it is like being away from her dad for couple of several months, much of which she hadn't known all this while.

We left our soul back at home that served us for these 3 worthy months of time off and family time with D. Filled with beautiful memories of home and travel, spurred with endearing moments of togetherness, we left for our home back in India with a heavy heart. Across we flew passing by oceans, green pastures of Europe, desserts of Middle East, traversing continents and surging ahead of the horizon, witnessing the dawn and dusk twice in 24 hours. As much my eyes were filled with marvel at the world below, my mind was filled with anxiety of the long parting we have far borne as a family for so long. All of this comes with some hope that we will soon be together for good. A hope that is positive and stronger than any other besiege.

Oakleaf Greens with Strawberry Balsamic Dressing


We are living through jet lag and zonal differences at the moment. It may take a while, though not too long as we set back into a wonted rhythm. As the sun shines high up in D's land and brings glory of summer and sunshine, so comes this recipe from me to you for greens that were not so familiar to me, atleast not until D introduced me to a land where salad greens make a prominent presence on their aisle in almost every supermarket. I had little known Oakleaf greens, till D randomly picked a pack of salad greens on our regular grocery shopping one day and I instantly fell in love with them there on. They are wonderfully tasty and versatile with cheese and salad dressing of your choice, if paired. The Strawberry Balsamic Dressing gives a kick of tang against the sweet fruity jam, spiced up with liberal doses of fresh cracked pepper. I suggest you taste the sauce for yourself and adjust the ratio of sweet and tang to your liking. It flaunts well dribbled on crisp lettuce leaves, (either Oakleaf or Romaine would do) and saltiness from fresh feta, adorned with some berries and walnuts. Additionally, I love to serve this salad with cheese sandwiched artisan bread; which obviously does not make it gluten-free, if you abide by it. Choice is really yours.

Oakleaf Lettuce with Strawberry Balsamic Dressing

INGREDIENTS

5 cups Oakleaf Lettuce, red and green
2 tablespoons Feta cheese
2 tablespoons mix of berries like Cranberries and Goji berries
8-20 Walnuts

For the Strawberry Balsamic Salad Dressing

1 tablespoon strawberry jam, preferable homemade or low sugar
2 tablespoons balsamic vinegar
2 tablespoons extra-virgin olive oil
Salt and pepper, to taste

DIRECTIONS

Heat the balsamic vinegar in a small saucepan and bring to a rolling boil. Reduce the heat and simmer till the vinegar reduces to half and becomes thick. Turn off the heat and whisk in the strawberry jam and the extra-virgin olive oil. Season it liberally with salt and pepper.

Place the Oakleaf greens along with mix of berries and walnuts in a wide salad bowl. Drizzle the salad dressing and toss it well to coat evenly in dressing. Serve.

Oakleaf Greens Salad-1

Raspberry_Ice_cream7

How to make 'No Churn' Vanilla Bean Raspberry Ripple Ice cream
At this very moment, our home is raining stone fruits and berries. Cherries precisely. Followed by peaches. Early last week when we went berry picking to a local farm, I went totally ravenous just at the sight of beautiful sapphires and rubies dangling off the bushes and trees. We went picking as many fruits as we could, quite greedily, like there would be no another day for them; from tree to tree, bushes to bushes, buckets after buckets till the scorching summer heat tired us out. With trunk full of cherries and peaches, came along blueberries and raspberries too.

I love how much my fridge is brimming with these fruits in every corner of the space it can accommodate. Every morning, before I reach out to the can of milk to make tea for my family, my hands are drawn to these fruits quite instinctively. Usually a long gaze and in reverence, I pop in a couple of them to start the day with. Some are then packed off into snack boxes for my husband for his mid day snacking. Our mid-mornings and afternoons are usually spent either snacking on them or pitting them to be frozen for a good part of the year when all these little gems will be gone. I wonder if I would let them stay there for so long.

Quite often when I am at farmer's market to pick up fruits, my head bubbles up several ideas of turning them into more delicious treats. My shopping cart is always loaded with more than what we need. Rationally greedy at the fear of season's fag end. But more often I find myself being reluctant to rive and macerate them into any other form. We are a family who adores fruits. Fruit, in its true form.

Vanilla_Bean_Ice_cream Raspberry_swirl
Raspberry_Ice_cream_2


When we came home with pints of ripe raspberries hand picked from the farm last week, I made this easy Warm Spiced Raspberry Jam leaving out the Strawberries. They went into almost everything - our bread, the daughter's milk, drizzled on yogurt, including accompanying as sides for parathas. I saved a few raspberries for this rippled ice cream that had been playing up on my mind for long. A rippled ice cream, where the layers of contrasting colors and flavors, each complementing other beautifully, create beautiful swirls when scooped to serve. And what can be better than having luscious baby pink ripples between speckled vanilla bean deliciousness.

This ice cream is very simple, quick and easy to put together as it does not require any ice cream maker. Two basic ingredients, heavy cream and condensed milk go into making the base for this ice cream. It takes less than 10 mins from counter to freezer and you have one of the most easiest, creamy and delicious ice cream ever.

IMG_3023


'No Churn' Raspberry Ripple Ice cream (Vanilla Bean Ice cream with Raspberry Swirl) - Without Ice Cream Maker

INGREDIENTS

For the Vanilla Bean Ice cream:

400 ml heavy cream, cold
200 grams condensed milk, preferably cold
1 tbsp. good vanilla bean, seeds scraped
1 tbsp. vanilla essence

For the Raspberry Ripple:

1/2 pint Raspberries
2 tbsp. caster sugar

Place the raspberries along with sugar in a blender and blend them to fine puree. Pass this through a sieve to separate seeds. Cook this puree on medium heat for 10 mins or until slightly thickened. You don't need the consistency of a jam, however too thin puree may affect the texture of the ice cream.

To prepare the vanilla bean ice cream, whip the heavy cream till it holds soft peaks. Then add the condensed milk, vanilla extract and vanilla seeds from a pod of vanilla. Continue to whip until the mixture is smooth and fluffy and holds soft peaks. Transfer 1/3 of the ice cream mixture to a loaf tin or your ice cream container of your choice. Drizzle 1/3 of the raspberry syrup on top. Repeat another two times so you have three layers of each. Using a fork, gently swirl the ice cream mixture to create a rippled look. Cover with a lid or plastic wrap and allow the ice cream to set in the freezer for at least 4-6 hours.

Raspberry_Ice_cream_4

Salad Leaves with Cheese Croutons, Pine Nuts, Feta Cheese with Dijon Mustard and Honey Dressing

Cheese Croutons Salad | Dijon Mustard and Honey Dressing Recipe
Earlier this month, we placed admissions for our daughter with a school here. It's her first stint of being at school and experiencing life outside the home here in the US. What we call as Nursery back in India, Kindergarten Prep is what they are known here. We opted the 3 day class with 3 hours per day to start with, where our little girl can play, learn and socialize with kids of her age like she did back in India. Unlike last year, I did not have butterflies fluttering my tummy this time around. :)

The school comes with promises. Like most schools do. With all those colorful brochures and pamphlets where couple of tiny tots from different ethnic races in their colorful attire thump their hands high up in the air with a tight fist symbolizing they will emerge to be toppers and winners, I pinned huge hopes on my daughter's learning here. The first two weeks went off in a whiz. Nothing much done. She walked in, played and walked out. She came back home happy with ugly sketch pen scribbles on paper that were below her capacity, or even for a three year old I suppose. Scribbling on paper is the first thing she did as 2 year old toddler. As a 4 year old today, she is equipped well to read and write alphabets and numbers and count them with ease. She draws well within borders and identifies good deal of animals, birds, colors, fruits, vegetables, et al. I expected continuity to her learning instead of re-learning those basics that are of least value to her.


Back in India where she spent a year at pre-school, the teaching curriculum was different than it is here. She went to school in an odd pairing of green blue uniform set, her most hated attire that she never recalls or speaks about here. Teaching, as monotonous it may sound was its methodical best. She had text books for each month - a month for colors, another on seasons, a month for food, a month dedicated to people around us, a month each of something to cover the year. She carried back homework every single day. There were notes with signatures exchanged between the teacher and the parent. Her school followed the Western style of teaching and curriculum, they claim. Yet, there was no respite to uniforms, truck load of homework, project work that seemed more a burden to the parents rather than the children. But in all, there was a lot she learnt progressively over the past one year. There were regular PTAs, a detailed progress card and it made me quite happy.

But here she goes. Essentially to a playschool in real sense. Play, fun and creative learning, they say. Scribbling on paper is no creative learning in my opinion. Its what toddlers do, not preschoolers. D says I could be the typical stereotype Indian mother who expects a lot of academic driven learning from the school and her daughter. I may not be the one, but if I am, I see no harm.

It could take a while for me to come to terms with these differences. Not too long, I know. But by then it will be time for us to head back to India. Till then its stress free, happy learning and exploring for her. For now, I see joy in her making new friends, mingling into diverse cultures and am glad she is enjoying every bit of her preschooler life.


Coming to the recipe, I have this gorgeous salad for you that is not actually complicated to put together as it may sound by the length of this recipe below. You may choose store bought bread croutons or just skip them all together. Even with the basic ingredients this salad gets notched up with sharpness from Feta cheese and Dijon mustard and Honey dressing. The cheesy bread croutons give a lovely crunch and go very well with the sweet-sour salad dressing.

Salad Leaves with Croutons, Pine Nuts, Feta Cheese with Dijon Mustard and Honey Dressing

INGREDIENTS

3 cups packed organic salad leaves (I used a mix of variety of lettuce, baby spinach, romaine, kale, arugula, etc.)
1 tbsp. cup pine nuts
2 tbsp. Feta cheese

For the cheese bread croutons:

2-3 slices of whole wheat bread
1-2 tbsp. olive oil
1 tsp. Italian herbs
2 tbsp. of mild cheddar

For the Dijon Mustard and Honey salad dressing:

1/2 tbsp. lime juice
1 tbsp. mayonnaise
1 tbsp. olive oil
1 tsp. Dijon mustard
1 tbsp. honey
Salt and pepper, to taste

DIRECTIONS

Chop bread slices to cubes of 1.5" each and arrange them side by side on a baking tray. Drizzle some olive oil and sprinkle some dried Italian herbs on them. Bake them in a pre-heated oven at 180 deg C (356 deg F) for 14-16 mins flipping over mid way to ensure even browning. Grate 2 tbsp. of cheddar cheese evenly over these bread cubes and bake them further for 5-6 mins. Remove and allow it to cool on a wire rack. They should crisp well as they cool down.

In a large salad bowl, toss the mixed salad leaves along with the baked bread croutons and pine nuts. Set aside to be tossed with dressing of your choice.

For the salad dressing:

Whisk lime juice, mayonnaise, olive oil, Dijon mustard, honey, salt and pepper in a bowl.

To put the salad together, drizzle a generous amount of the prepared Dijon mustard and honey dressing and toss them together. Serve immediately.

Notes:

To make it gluten free, skip the bread croutons or substitute the same with gluten free bread.

Spiced Roasted Walnuts


Right at the fag end of the year, in midst of the festivals that went by past month and more awaiting the mark of year ending, here I am making every sincere attempt to blog and replenish my repertoire with some recipes to tease your taste buds. With barely a blog post a month in the recent past, I have been panting hard to fuel this space with enough meat off late, more evidently seen from the sparse posts that pop out of my drafts occasionally or my dwindling presence on any social networking forum. The motivation, that has been lacking from several other personal commitments consuming my time and the dear camera lens of mine that gave upon me recently. Yet, at the hindsight of my brain lingers a constant thought to fuel this little space of mine with recipes, even if that means battling a writer's block or picking an offbeat recipe from my drafts for a go.

Spiced Roasted Walnuts_Prep1 Spiced Roasted Walnuts


It hit upon me hard how fast the time is fleeting by and how much close we are to the year end when the folks at Sheraton reached out to me to be a part of their Cake Mixing ceremony. December already? Almost. I think hard. My thoughts racing by. My heart pounding faster. Where and how did I let the time go? The Indian festivities crept in and they slid by sooner than I had realized. We cooked a lot. Partied, merried and ate well too. The usual course of chalkis, laddus, karjikai, shankarpali, nippattus, masala shenga and whatnot was followed this season too. We made them all at home and saw joy in sharing them with our family and friends. But none of them made it here. And I barely realized it go by.

So I bring about these simple, deliciously spiced and roasted walnuts for the Thanksgiving today. The spices that go in it to tangle the taste buds with measures of salt, spice and sweetness. They are baked and can be stored for a while. They make excellent for gifting your friends and relatives. And I hope they make up for the loss of all those recipes I have been meaning to post here for a while!

Spiced Roasted Walnuts


Spiced Roasted Walnuts

INGREDIENTS

1 tablespoon honey
2 teaspoons olive oil
2 cups walnut halves
2 tablespoons sugar
1 teaspoon coarse salt
1 teaspoon ground cumin
1/2 tablespoon ground coriander
1/8 teaspoon red chilli powder

DIRECTIONS

In a large bowl, whisk honey and oil. Add in the sugar, salt, cumin, coriander, and red chilli powder. Toss in walnuts; mix well to coat. Transfer to a baking tray and bake in a pre-heated oven of 200 deg C for atleast 20 minutes. Remove and allow to cool completely. Store in an air-tight container.

Spiced Roasted Walnuts


Kokum Mint Spritzer

How to make Kokum Mint Spritzer | Kokum Mint Sherbat
Its taken longer than intended to be here. Between this time, I slipped and slid deeper between cracks of workload. At this very moment, I have several windows running on my taskbar, sticky notes spread in all corners of my screen, many official mails to respond and a constant juggle with alt-tab keys to switch between the screens. There’s an excel sheet burdened with numbers everywhere, so heavy that I'll soon need to pop some pills to fight off my pounding head. My weary eyes have been rolling from ends to ends of screen with my fingers constantly prancing on the keyboard. The sudden surge in workload has been keeping me busy late nights and in offbeat hours.


Kokum Mint Spritzer_1


A bit of relief comes from this Indian Food Blogger Meet that I so much look forward to. When the girls at IFB meet got together and rolled out this idea, I instantly knew my calender had to be blocked for these two days. Despite being an active blogger for over 5 years, I haven't been actively participating in blogger meets owing to personal constraints. So when this came across, I sent out leave notes to my manager highlighting my absence from work for that day.

IFB Meet has loads to offer. It comes with many unspoken promises. If you are not convinced, hang around here and you'll know the depth of effort these girls have been putting in to bring food bloggers together. I am looking forward to meet and greet many lovely people there, all sharing similar interests and passion for food blogging. It will be a great place to break ice with many fabulous bloggers whom I have never seen or met or virtually known. I trust my instincts that this will be worth every bit; that there will be an overload of fun, filled with learning, food, friendship, giggles, laughter and loads to take away!

While food bloggers on facebook have been pouring in recipes for a line up of contests for the registered participants at IFB Meet, I wasn't too far from this temptation. IFB Meet 2014 announced The Urbandazzle Contest recently, where the participants are expected create an interesting monsoon / summer cocktail or mocktail recipe with an Indian flavour. I put together this beautiful Kokum Mint Spritzer, quite inspired by an ingredient that belongs to my culture and is traditionally so Indian. I couldn't have thought of anything better. And I wonder how much more impressive this drink would look if you presented in UrbanDazzle Glassware! A stylish drink that's a perfect coolant on days when sun shines on your shoulder or when raindrops pitter patter on the window sill.


Kokum Mint Spritzer_2


Kokum Mint Spritzer

To know more about kokum read here.

15 dry kokums
2 1/2 cups sugar
A generous pinch of salt
5 cups of club soda
1 cup warm water
Handful of mint leaves

Wash and soak the kokums in 1 cup of warm water for atleast 2 hours. Once they soften, grind them along with their water till they are fine in paste. Sieve them through and discard the fibre. Into the collected kokum juice, add in sugar and salt and stir well till they are completely dissolved. Allow to chill in fridge for 2 hours. When about to serve, top with sparkling water or club soda. Add in broken mint leaves and shake vigorously in a cocktail shaker. Sieve and serve chill. If serving this to toddlers (as in my second picture), skip the sparkling water / soda and replace with regular mineral water instead. Top with mint leaves. Serve chill.


Kokum_Mint_Spritzer_3