Showing posts with label Main course. Show all posts

Mini Sweet Bell Pepper Rice Bath

How to make Karnataka Style Rice Bath | Easy Capsicum Rice Bath Recipe
'Rice Bath' is a common term used in Karnataka for dishes made with cooked leftover rice. It's a spiced rice where vegetables are added to make a nutritious and wholesome meal. The recipes differ from one family to another with many swearing by vaangi bath powder, and others using the readily available stash of sambhar or rasam powder. I keep it simple by using homeground sambhar powder that comes from my mom's kitchen. I've seen my mom do it that way and I've been following it ever since.

Rice Bath is made in a kadai or a large wok, unlike pulao or biryani where rice is cooked raw along with spices. It's a great way to revamp leftover rice and turn it into something more wholesome and scrumptious. This is also my go-to base recipe for Tomato Bath. I've used mini sweet bell peppers here, but it works equally good with capsicum, greens or vegetables of your choice.

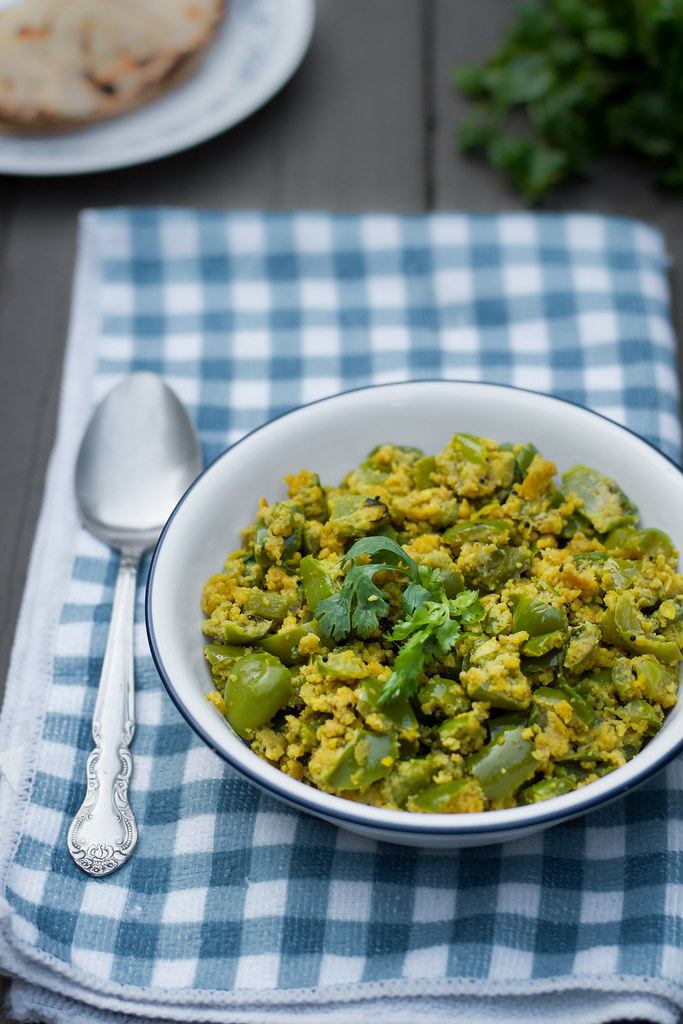
Mini sweet bell peppers are tossed in a garlicky, onion and tomato base and stir fried with rice. Some frozen sweet peas are added too. Sambhar masala goes in for the heat. Sometimes I pep it up with red chilli powder when in a mood for spice. And finally I round it off with lemon juice for acidity and top it with roasted cashews for the crunch.

Mini Sweet Bell Pepper Rice Bath

INGREDIENTS

2 tbsp oil
1 tsp mustard seeds
2 garlic, finely chopped
1 small onion, finely chopped
1 sprig curry leaves
2 green chillies
2 tomatoes, finely chopped
8-10 slit mini sweet bell peppers
2 cups of cooked basmati rice
2 tsp sambhar powder
Salt to taste
Juice from 1 lemon
Roasted cashews and coriander leaves to garnish

DIRECTIONS

Heat 2 tbsp oil in a cast iron wok, add 1 tsp mustard seeds and let it splutter. Then add 2 chopped garlic cloves and 1 finely chopped onion and fry for few seconds. Next add torn curry leaves and chopped green chillies and fry for few seconds. Add about 2 tomatoes, finely chopped and fry till they soften and reduce in volume. Add 1/2 cup frozen peas and cook for a minute. Then add about 10 slit mini sweet bell peppers and stir fry for a minute. Add 2.5 cups of cooked basmati rice, 2 tsp sambhar powder and salt to taste. Stir the rice and masalas well so that the flavors are well incorporated. Cook uncovered for another 2 minutes on medium low heat. Remove from heat and add juice from one lemon. Garnish with roasted cashews and coriander leaves. Serve with a side of chilled yogurt or raita of choice.

Mushroom Makhani

How to make Mushroom Makhani | Easy Mushroom Makhani Recipe
It was in brief period of time, sometime in June last year when spring was fading out unhurriedly, giving itself into the summer warmth, and the temperatures were just about steadily poised in their pleasant 60s, that I felt a sudden urge, an unfounded obsession over mushrooms. I had no idea what triggered it. I must have been under the weather, or must be the sight of damp mulch springing off paunchy shoots while the mist shroud in, or may be the birthday party I attended late spring where stuffed baked mushroom caps was all I ate because it was beyond delicious and I could barely take it off my mind for several days after the party. I'd go out for walks and randomly sight odd pairs of mushrooms sprung on peat soil and tree trunks, watch them in awe, and strike a sudden temptation to cuddle my hands around a bowl of warm mushroom soup. In my strong desire to savor them, I toyed the idea of cooking them for all three meals a day, crooning over mushrooms on toast for breakfast, mushroom biryani for lunch and this mushroom makhani for dinner. I had the fortune of sparing my family to bear this marathon brunt of mine as they were summer vacationing back in India, visiting relatives and friends and enjoying the glorious ripe seasonal mangoes in kilos, while I boggled silly over these fungi. Insane you may have called me, had you sneaked into my lunch box, or my dinner plate that week, that, my meals were inadvertently smeared with mushrooms in their ensemble. I would visualize them in my shopping for groceries - the buttons, shiitakes, oysters, portobellos everywhere. Umbrella caps in supple tones of milk and tans - some pumped up, some stout, others squat, and shaggy, unkempt in their mannerisms, their piggy stems ballooned underneath, their tender skins crust with dirt and mire that needed gentle strokes in water bath to glisten their starkness, leaving their glamorous gills unhurt on the underside of their caps. None the less glorious in all forms.

Mushrooms


After marking a day on calendar and striking it off with meals rigged with mushrooms, I was out and about that obsession for a while, staying away from aisles at grocery stores, thinking beyond its capacity. I relieved this obsession, so glad at it; its yearning so deep and willingly conspiring, much like echoing phrases from Paulo Coelho's The Alchemist, "When you want something, all the universe conspires in helping you to achieve it." I conspired it. I achieved it.

Makhani Masala


Much of this recipe I share today is a remake of my recipe for Paneer Makhani, so you make the makhani gravy ahead of time and prepare the actual curry just before serving. The makhani gravy is sinfully delicious on it own, but when you throw in mushrooms, they take on a new level of deliciousness. The meaty texture of mushrooms complement the creamy gravy, giving it depth of flavors. This rich dish is fit for parties and celebratory occasions, but if you want to give yourself a break from mundane home cooking and serve up some exoticism on weekends for your family, then this be it.

Mushroom Makhani


Mushroom Makhani

INGREDIENTS

1 cup of prepared Makhani Masala (refer here)
200 grams button mushrooms
1/4 cup cream (adjust to your taste)
1/2 tsp. of kasuri methi or dried fenugreek leaves
Fresh coriander, cream for garnish

DIRECTIONS

Prepare the Makhani masala as in recipe mentioned here. It should yield approximately about a cup of thick gravy.

In case you are using refrigerated or frozen gravy, remove from the fridge and allow it to come to room temperature. Add 1/2 cup water and bring it to a simmer.

If you have prepared the gravy masala fresh, then to the simmering gravy, add 1/2 cup of water and diced mushrooms and bring it to a boil. Stir and cook covered for 10 minutes. Once the mushrooms are cooked, add the cream and simmer for 2 minutes. Transfer the Mushroom Makhani to a serving bowl and garnish with more fresh cream, ginger juliannes and coriander leaves. Serve hot with rotis, naans or kulchas.

Mushroom Makhani

Carrot Soup

How to make Easy Carrot Saaru, Easy Carrot Soup
All through the fall, I stocked pumpkins at home in sheer keenness to make a good pumpkin soup that I could share with you all. I was amused, delighted beyond words to watch pumpkins everywhere, on market stands and home fronts, in malls and on window sills, on blog feeds and in ad mailers. Our favorite grocery stores smelled warm from pumpkin spices and its produce. Our office had spice infused fresheners in the lobby to welcome guests. The coffee was not spared either, flavored with pumpkin spice in it too! Tell me, who wouldn't be lured? So each time we stepped out grocery shopping, along came a pumpkin or its sibling in form a squash, that made its way into our shopping cart, judiciously sized to suit two meals for us as a family.

On a seasonal high note, I did make soups and stews, and plenty at that, laboriously skinning the peels, slicing and dicing them, and boiling them to pulp over pot of stock. I choose not to bake, rather simmer over a pot on stove, as that's a task I like to leave for days far less busier than weekdays, when I don't have the time to worry about our over-sensitive fire alarm screeching off at the slightest variation of warm air emanating from the oven. That's another story to say. The soups though did turn out creamy, and deliciously vegan, not necessarily warranting any fat or cream in regard to heighten the flavors or their sumptuousness. But they got gulped down faster than I expected, hot and steaming, ladles after ladles, cold fingers wrapped around the warm bowl for comfort, either dunked by toasted garlic bread or tossed along with piping hot rice, savored snugly in our warm dining area while the leaves were busy shedding under the seasonal transition.

Carrot Saaru


It happened so, that each time I planned a soup, I was swooned by the dire beauty of the squash and pumpkins, that I shot several preps of them much ahead of sunset in the noon. By the time the squash was sliced and diced, cooked, pureed and boiled to perfection, finally seasoned to be served, it was time sun called his day and the darkness overcast the late noons in its thick black bile. I finally gave up on presenting my super-creamy-vegan-butternut-squash-soup here, instead, the year end holiday baking mania took over the house bringing more cheer to otherwise gloomy noons.

We've step foot into the new year, and I've welcomed it with my arms wide open. I have no resolutions that pound my mind hard, so there's none really to make. But I realize this blog is devoid of soups and I want to fill that space. I need to make a beginning, and here's one that fills the bill so well. Apt in time, a recipe for a good Indian soup in the beginning of a new year. It can't get better than this.

I pray this year croons high hopes, brings truck loads of good luck, fab health and immense happiness, and heaps of enthusiasm to live the year ahead positively. I should have been rolling in trays of sweets or brought a dessert along here, commemorating the new year and reminiscing 'oh whatta year 2016 was for me!', because it was gratifying in good sense, and worthily etched into our memory with a fair balance of highs and lows, but instead, I have come along with bowls of warm and comforting homemade carrot soup that clamors itself so South Indian. This is what makes me the happiest - simplicity in a bowl. It defines what I would love my year to look like - simple, clean, uncluttered and subtle in my living and approach.

Carrot Rasam


Carrot Saaru | Carrot Rasam | Indian Carrot Soup

Prep Time: 15 mins | Cooking Time: 15 mins | Serves 4

INGREDIENTS

2 carrots, chopped
2 cups water
1 tbsp. tamarind paste
1 tsp. sambhar powder
1/2 tsp. turmeric powder
Salt to taste

For Tempering:

2 tsp. oil
1 tsp. mustard seeds
1/2 tsp. asafoetida powder
1 sprig of curry leaf
1-2 whole red chillies torn

DIRECTIONS

Boil the chopped carrots along with 2 cups of water and turmeric powder until they are fork tender. I pressure cook them on 2 whistles as its quicker to do so. You can pan boil it if you do not have a pressure cooker. Once done, allow it to cool and blend it to a puree in a mixer.

Transfer the carrot puree into a thick bottom pan. Stir in the tamarind paste, salt and sambhar powder. Add additional water to adjust the consistency of the saaru / soup. I like to have this saaru slightly thicker than our traditional rasams as it brings out the texture and flavor of carrots well. Bring the saaru to a rolling boil and then simmer for about 2-3 minutes. Turn off the flame and set aside to temper.

To temper, heat oil in a small pan. Add mustard seeds and allow it to splutter. Add the asafoetida powder, torn red chillies and curry leaves and fry briefly for few seconds. Turn off the flame and add this to the prepared saaru. Serve hot with steamed rice or drink them steaming hot right out of soup bowls.

Carrot Soup


Paneer Makhani

How to make Paneer Makhani| Easy Restaurant Style Paneer Makhani
Back in the 80’s and 90’s, the only kind of restaurants we went out to as kids were the ones that served good North Indian cuisine. A good ambiance and décor was just one factor. A commendable restaurant however, was measured by the North Indian fare it served on its menu. A simple, hot Dal Tadka that had a great smoky flavor; the rich Palak Paneer in its deepest green hues - deeper the green, better the dish - that meant, it was stir fried better, hence it tasted better; Baingan ka Bharta dotted with cooked fresh peas and shreds of ginger juliennes, topped with fresh cream or melting butter, Choles and Rajamas that were spiced liberally and had a good layer of fat floating atop, the ladle going deep to stir it up gently before being served by the waiter; all of this usually formed an integral part of an Indian restaurant menu. This was either served with an assortment of Indian flatbreads like naans and kulchas or flavored rice like Biryanis and Pulaos.

No Indian restaurant menu though was complete without the quintessential assortment of gravies made from either the fragrant butter and cream based tomato sauce, or the white cream and nut sauce. Dal Makhani, Paneer Makhani, Malai Kofta, Veg Makhani, Paneer Butter Masala, Phool Makhani, Navratna Korma, Shahi Paneer and such alike formed the elite part of the menu. They weren’t the usual dishes most moms would cook at homes, hence relishing them at restaurants was a treat we looked forward to. I loosely remember how our palms smelt of makhani masalas after several hours of being back home from savoring the heavy North Indian meal at those restaurants.

Paneer CubedMakhani Masala 2


Though, that was a thing of past. We no longer gauge a restaurant by the standards of Indian food served. There are plenty of global cuisines to explore from, so usually an Indian fare takes the least preference. We love settling to home cooked Indian meals most of the times, replicating restaurant styled dishes at home in the comfort of my kitchen. On a Valentine's Day, when the restaurants are brimming with crowd, here's a better way to cozy up your evening - with good home cooked food and music to make your day memorable with your loved ones.

I have a fantastic recipe for Paneer Makhani for you. It's a keeper for years to come and you may want to thank me for that. The heart of a good Paneer Makhani dish lies in its base, the rich and flavorsome tomato cream sauce that can be made ahead and stored for a couple of weeks in the freezer. Inspired by Soma's post here, I have loosely adapted her recipe for Makhani Masala, tweaked it a bit to get a beautiful recipe that makes an array of dishes with just one basic gravy. This is where you start and can further adapt it to make many more popular recipes that are usually found in Indian restaurants.

So this Valentine's Day, if you are running out of place to dine out or if you've made no fancy plans to spend the evening as you had wished to, whip up this restaurant styled recipe in your kitchen, lay your table, light your candles and surprise them with this dish in the warmth of your own home. And don't forget to tell them how much you love them. Ofcourse, if you don't, this Paneer Makhani will do that for you!

Paneer Makhani 1


Paneer Makhani Restaurant Style

INGREDIENTS

For Makhani Masala

3 tbsp. butter / ghee / oil (more you use, better the flavor, hence do not reduce it)
2 green cardamoms, lightly crushed
1/2 cinnamon stick, broken
1/2 tsp. fenugreek powder (fenugreek seeds will also do)
1 green chilli, slit to half lenghtwise
1 tsp. fresh garlic paste (skip this for satvik version)
1 inch ginger, freshly grated
5 large ripe, red tomatoes, pureed to paste
1 tsp red chilli powder*
1 tsp. garam masala
1 tsp. kasuri methi, gently crushed
Salt to taste

For Paneer Makhani

1 block / 200 grams paneer, cut into cubes
1/4 cup cream (adjust to your taste)
Fresh coriander, cream for garnish

DIRECTIONS

To prepare the Makhani Masala:

Heat the butter / ghee / oil & add the green cardamoms, cinnamon stick. Fry for 20 seconds. Add the fenugreek powder / seeds and fry for another 10 seconds. Never let the fenugreek burn, else they will turn the dish bitter. Add the grated ginger, the garlic paste and fry them till the raw smell is gone. Next add the tomato paste and cook till it reduces and oil bubbles up from the sides of the pan. Add the red chilli powder, slit green chilli, garam masala, and salt to taste. Finally crush kasuri methi gently between palms and add it to the simmering gravy. At this point you can either turn off the flame, allow the gravy to cool and store the prepared Makhani Masala in air tight container and freeze it for future, or proceed ahead to prepare the Restaurant Styled Paneer Makhani.

To prepare the Paneer Makhani:

To the above simmering gravy, add 1/2 cup of water and cubed paneer and bring it to a boil. Stir and cook for 3 minutes. Finally add the cream and simmer for 2 minutes. Transfer the Paneer Makhani to a serving bowl and garnish with cream, ginger juliannes and coriander leaves. Serve hot with rotis, naans or kulchas. Pairs well with Jeera rice too.

Paneer Makhani 2


Notes:

- The above quantity of Makhani Masala will suffice for this Paneer Makhani recipe. Should you make in larger quantities, you can easily double up the recipe and store them in the freezer.

- This is a rich dish and is supposed to be made with butter or ghee. If you want it to be healthier use oil instead of butter or ghee. However, you are compromising on the taste.

- The color of the gravy depends on the amount of cream and the red chilli powder being used. If you want a richer red color, use Kashmiri chilli powder. More the cream, lighter the color.

- Kasuri methi leaves are dry fenugreek greens. Its a MUST in this recipe and renders a lovely flavor. However, don't use a lot of it. It can be overpowering.

- In case you plan to make ahead and store the makhani gravy, then I recommend you use half a tsp. of the kasuri methi greens to the gravy. The other half tsp. can be added as you prepare the final dish. This will enhance the flavor of dish and fresh crushed green render amazing flavor to the dish.

- There are no onions used in this recipe. You can avoid the garlic for a satvik version. However do not skip ginger as it gives a lot of flavor to this dish.

Tawa Pulao 1

How to make Tawa Pulao | Easy Vegetable Tawa Pulao Recipe
Last month, when everyone was busy counting down days for Christmas and gearing up for year end celebrations, I was out in Pune, spending a fair share of December in a city familiarly unfamiliar to me. Familiar, because any Bangalorean can best draw similarities to this city. Its traffic, roads, breadth of the city, the weather, all so similar. Unfamiliar, because this was my first time here. Its language, people and directions, so unfamiliar. I spent weekdays at my desk, busying myself between colleagues, emails and phone calls, and sightseeing the city on weekends. I will give you a glimpse of Pune through my eyes in my next post, and I promise on that; but for today, I have something more to share. Its a bit of what I had been procrastinating for a while because of my wrung out busy life.

Sometime around the first week of December, in an afternoon by the pool side of JW Marriott, sipping some refreshing rose mocktails and exchanging greetings with a couple of bloggers and press folks, a handful of us came together to be a part of Canola Cook-off event hosted by Chef Jolly Surjan Singh. We flocked around the Chef that noon as he spoke about his love for Canola oil and spun his magic around the table, cooking some versatile Indian dishes at the first Canola cook-off sponsored by Canolainfo.org. Mind you, its not a brand they endorse, but an awareness they are trying to create towards understanding Canola oil and creating its identity in Indian cooking. The rest of the evening was spent in chatters, sipping tea as we savored the Khada Desi Palak, Tandoori Broccoli, and many other delicacies that Chef had created to display the versatility of this little known oil.


This isn't my first time with Canola. The first time I saw it, it read C-A-N-O-L-A, and I had assumed it was a brand name. I stared at it for a long time trying to identify where it came from. Coconut? Olive? Groundnut? Sunflower? What breed did it belong to? It glared back at me, its words 'Canola Oil' in its bold black font and that left me worrying its identity. In a new country, a new home, a new kitchen, it sat on the kitchen counter-top in a gleaming plastic bottle, radiating its thin golden liquid, feigning like a silly hypothetical thing. We did not grow up knowing each other. It was as alien as meat is to a born vegetarian like me. I had never heard of it till I traveled out of my country. Nor had I encountered it on the webspace. That's now a thing of past. I read up on it later and soon we were friends shaking hands with every meal I made till the time I was there.

So what's canola oil and why are we Indians not so aware of it? A little known to most of us, it comes from the seeds of the rapeseed plant that is extracted and processed to remove some unfavorable substances. It's a heart friendly oil with less than half the saturated fat of olive (now, do you believe that?) or soybean oil, that gives you more excuses to fry your samosas, bake muffins or use them in tadkas intrepidly. Grown commonly in the West, mainly Canada and US and widely used there, this oil is slowly walking baby footsteps in Indian markets. Having lived in the US and used it in every meal of the day, I know how popular canola oil is back there. Rediscovering canola through this event was like meeting a long lost friend, someone whom you had known a while ago but had faded out of your memory. They appear unexpectedly and brush the rust off the oblivion. A bottle of canola now sits on our kitchen counter, in a prominent spot where the vegetable oil had once reigned that space. We've fried jamoons, roasted chivda, used them in salads, stir fries and pulaos with the same ease as with our regular cooking oil with no change in flavor and additional boast to health. I'm excited to share with you my recipe for Tawa Pulao, made with this golden goodness; a street side food often found on carts and road side eateries in Mumbai. Its quick, delicious and healthy one pot meal made from steamed rice, vegetables and pav bhaji masala. For me, this serves the best way to use up left over rice from the previous meal.

Tawa Pulao_2


Tawa Pulao

INGREDIENTS

2 tbsp canola oil
1 tsp cumin seeds
2 tsp ginger-garlic paste
1 onion, finely chopped
1/4 cup fresh peas
2 tomatoes, finely chopped
1/4 cup each of chopped vegetables like carrots, beans, capsicum, broccoli
1/4 tsp turmeric powder
1 tsp chilli powder
2 tsp pav bhaji masala
3 cups cooked rice
Salt to taste
Juice of 1/2 lemon, squeezed
Finely chopped coriander or fried green chilli, for garnish

DIRECTIONS

Heat oil in a heavy bottom pan and fry cumin seeds till they brown. Add ginger-garlic paste and fry for a few seconds. Then add the onion and sauté till its brown. Add the fresh peas, tomatoes and turmeric powder. Cook till the tomatoes are soft. Next, tip in the chopped carrots, beans, broccoli and capsicum and fry till they are nearly cooked. Add the rice and mix well with the vegetables. Add the salt, red chilli powder with pav bhaji masala. Toss well and cook on high flame for a 2 minutes, till all the masalas coat the rice well. Switch off the flame. Squeeze the lemon juice and mix well. Garnish with coriander leaves and serve with yogurt / raita and fried green chilli, if desired.


Tawa Pulao Plated

Besanwali Simla Mirch

How to make Besan wali Simla Mirch | Simla Mirch ki Subzi | Capsicum Recipe
When the weather plunged low, it brought along bouts of cold, incessant sneezing and coughs that plagued our home. We fell sick in a row, taking turns to seize the bed and blanket. The bedside table saw our favorite magazines being replaced with a spread of ayurvedic tonics, amrutanjan and all kinds of inhalers for the most desired relief. What good were those magazines when our eyes threatened to water in a stream and our nose constantly bled phlegm? It seemed like a trending viral infection as each of us made our way in and out of the bed, and nearly all of whom I knew were suffering the way I did. I nearly survived each day of that heavy headiness with glasses of warm water, hot kashaayas and dozens of handkerchiefs by my side. Days have finally passed by, recuperating and feeling much better, apparently much slower than we had liked. Coughing and sneezing are showing signs of receding, though the chest is still heavy with congestion. I hate fighting the dreaded infection, but alas!

On my way to recovery, with spurs of intermittent coughs and an inhaler constantly plugged into my nostrils, I am back to blogging with this recipe for Besan wali Simla Mirch that has been my favorite for long. I have been looking forward to share this with you for a while, however each time we make it, it's wiped clean till the last bit. It was hard to save this portion for this post! That gives you an idea of how much we love it. It's a simple dish where green bell peppers are paired with roasted gram flour and other spices bringing out amazing flavors. On days when I am time pressed to make a simple dal to pair along, this recipe comes a savior as it takes care of both the vegetable and dal in a single dish. We usually serve this as a side dish for chapatis / phulkas along with salads. I hope you enjoy it as much as we do.

Besanwali Simla Mirch 1


Besan wali Simla Mirch

INGREDIENTS

1/2 cup gram flour / besan
3 medium sized capsicums, diced
1 inch Ginger, grated
1 tbsp. Oil
1 tsp. Mustard seeds
1 tsp. Red chili powder
1 tbsp. Coriander powder
1 tsp. Turmeric powder
3-4 tsp. Water
A generous pinch of asafoetida (hing)
1 tsp. sugar
Salt to taste

DIRECTIONS

In a wide mouthed pan, dry roast the gram flour (besan) it till it changes color slightly. The flour should smell fragrant as it is being roasted. Remove from the pan and set aside to cool.

Heat oil in a pan. Add mustard seeds and fry till the seeds crackle. Add hing and chopped ginger and fry for a minute. Then add the diced capsicum along with turmeric powder and saute it for few minutes till it's cooked, yet has a nice crunch. Add chilli powder, coriander powder, salt and sugar to taste and saute further on a low flame.

Add the roasted gram flour, sprinkling a couple of teaspoons of water into it. Cook on low flame for 10 mins. Transfer to a serving dish and garnish with coriander leaves. Serve hot with rotis or as sides with steaming hot rice.

Methi Mutter Malai Recipe

How to make Methi Mutter Malai Restaurant Style | Methi Mutter Malai Recipe
Around the weekend, my mind scouts with ideas as I leisurely spend the day in the kitchen. The weekdays often go by unnoticed, dissolved in the hectic day at work followed by the madness of traffic and noise of city life. The usual mundanes of flurry and rush that I needn't talk about. As the weekend transpires, I seek an inspiration to cook that usually comes from the morning trip to the grocery store. I enter the store in enthusiasm, more so from the several moments I spend watching crates of fresh vegetables and fruits being loaded off the trucks and piled into carts to be brought in by the storekeepers. It's a sight I cherish with great delight and an absorbing interest.

Fenugreek and Peas


The grocery shopping this weekend saw me picking bunch of fresh fenugreek greens that gleamed off from the rest of the greens. For a long long time, my mind has been set on making restaurant styled methi mutter malai well in the comforts of my kitchen. Having had this a couple of times at restaurants in the past, and while seeing a lot of bloggers on web-space make this with ease, my heart was sold as I saw them on the grocery counter. May be it was the fresh leaves with tender stalks or the firm sap greenness that called out to me; quite undeterred I had a couple of healthy bunches carrying back home. You bet, I would probably not spare the roots too, given the chance may be!

Peas


On another note the start to this weekend went off quite memorable. Late evening on Friday this week, I headed to Aloft to join them in their second MTV Asia Musical awards show where we saw the top five finalists battle out for the winning position. It was a musical night filled with glitzy, glamour, creativity over cocktails and canapes. The bands had it all that brought them up there. Their music, soulful compositions, phenomenal talent with creativity and technical skills - all put together to fill the space with their youthful aura.

So when Saturday came by, my mind was still grooving into the energies of the night before. Saturday, my grocery bag was stocked with all that I needed for a good methi mutter malai. However, I put that aside for the Sunday lunch. Instead, I pulled off the day lazying around and filling myself a light brunch and fruits, skipping dinner. Sunday though, this methi mutter malai and pulao made up for a royal feast.

Methi Mutter Malai


Methi Matar Malai needs no introduction to most. Hailing from the Punjabi North Indian cuisine, this dish can be commonly found in the menu card of most North Indian restaurants. The fresh fenugreek leaves and green peas are simmered in a rich, white and creamy gravy base, it's simplicity and richness that will enamor you in the first place. It's great served as a side dish for roti, parathas, naan or pulaos.

It's not a dish one would recommend for a daily indulgence, yet, it never harms when it promises some health through greens that are packed with nutrition. The dish is fragrant and so mildly spiced that its loved by kids too. What I love is the sheer simplicity of this dish, the mild flavors and richness that this recipe offers, quite replicating the Indian restaurant styled methi mutter malai.

Methi Paratha


Methi Matar Malai | Restaurant Style Methi Mutter Malai

INGREDIENTS

2 cups chopped fenugreek / methi leaves
1 cup fresh / frozen green peas
1 tsp cumin seeds
1/2 cup milk
1/4 cup fresh cream
1 tsp sugar
2 tbsp oil
Salt to taste

To be fried and ground into a paste

1 onion
1-2 green chillies
1/2" ginger clove
1-2 garlic cloves
2 cloves
Seeds from 3 cardamom pods
1/4 cup cashewnuts

DIRECTIONS

Soak the cashewnuts in warm water for 20 mins. Drain and set aside to be ground along with other ingredients. In a pan / kadai, heat a tablespoon of oil and fry onion, green chilli and ginger till the onions are transparent. Turn off the flame and allow to cool. In a mixie, grind to paste the fried ingredients along with the soaked cashews with little water. Set aside.

In a pan / wok, saute the chopped fenugreek leaves along with half a teaspoon of salt till they wilt and let out the water. This will take about 5-6 minutes. Switch off the flame and allow it to cool to room temperature. Then, squeeze the water out of the leaves to remove the bitterness from them and set the drained leaves aside.

In another pan / kadai, heat a tablespoon of oil. Fry the cumin seeds. As they sizzle in the oil, add cloves and cardamom seeds, Then add the green peas and fry them briefly for couple of mins till the peas are cooked. Next, add the cooked and drained fenugreek leaves with 1/4 cup water. Add the milk and cream. Simmer on low flame for 5-6 minutes. Add the sugar and salt to taste and mix well. Transfer Methi-Matar Malai to serving dish and drizzle little cream on top if desired. Drizzle some fresh cream on top. Garnish with coriander leaves or mint leaves and serve methi matar malai hot with naan, parathas or phulkas.

Methi Mutter Malai with Methi Paratha


Notes:

- Its not necessary to saute the fenugreek leaves prior to adding this to the recipe. However, fenugreek greens have some bitterness, and if you wish to avoid this coming through, it would be good to saute them first and then use in the recipe. This also helps in retaining the white color in the gravy.

- The water drained from fenugreek leaves is nutritious and hence instead of throwing it away, you may use them to knead dough and make rotis from these. Infact, my photographs will show some of the rotis I made using the water from the boiled greens. They taste quite like normal rotis and the bitterness is barely known.

- I used the small spicy variety of green chilli in this recipe. It provides the desired heat to the dish and does not affect the color of gravy. Alternatively, you may slit the green chilli lengthwise and fry in oil along with cumin and spices.

- On adding milk and cream, do not boil on high flame. Instead keep the flame on low and allow the gravy to simmer. This will avoid splitting.

- Cashews are important here as they not just lend flavor to this recipe, but the volume and richness to this gravy. You may replace cashews for soaked almonds as well.

- You may skip the milk cream and just use unsweetened evaporated milk / milk powder here. Milk powders usually have added sugar, so watch the quantity used and skip sugar. A heaped tablespoonful should do. The recipes with white gravies are usually mildly sweet. This sweet richness comes from the use of milk, cream and sugar. So don't be surprised. The flavor will vary if cream is substituted and the dish will not be as rich as the cream based.

TonDekayi HuLi_1


I had a craving last noon. It was a serious one to say. A craving that cracked me crazy. In a long time I reminded myself and yearned for a morsel of it. Just a morsel that would satisfy me and feel at peace. May be it was the dreary weather or miss of my daily dose of conversation over phone with amma-appa, ever since they whisked far away to explore the greener pastures of Europe for their annual holiday. But it kicked me hard in my stomach. So hard, that I reached out to my husband on a frantic phone call to make a trip down to Indian stores that very evening, in every sense of urgency. 'Twenty-eight miles just for a coconut? Can it not wait? Wasn't it two days ago we had been there?', he zapped in midst of Monday morning chaos at work, composing his thoughts over matters more important than a mere coconut. Damn! Who knew I would hanker so much for a simple bowl of huli! For a craving that has least sense of timing or inventory (could I just not do with the leftover sweetened coconut I used here?), but had to be appeased.

TonDekayi HuLi_prep1 TonDekayi HuLi_prep2 TonDekayi HuLi_prep3


Truth to be told, the past three months never saw a day with fresh coconut. We never bought one here. The Indian store we shop at barely stocks one or two sad looking coconuts, often sleeping on the verge of their expiry bed. The packaged grated coconut is a bigger risk to buy. What if it tuned out to be rancid? After all, with no packaging date on it whatsoever, I wonder for how long it has been sitting there. The brand new blender I bought, advertised it could churn blocks of ice to granita in seconds. It broke out within days with a nasty burnt smell while attempting a simple fruit-date smoothie. That, enough was a hint for me. It could not stand the heavy duty grinding of Indian spices and coconut.

TonDekayi HuLi_2


Coconut chutney, tambli, gojju, paladhya, menskai did not feature in our menus. Otherwise the usual course of tip-toeing and balancing myself between Northern and Southern cooking, here I was, survived mostly by chopping copious batches of onions, brewing gallons of tomatoes to broth, throwing mounts of red chillies and garam masalas in almost every fare I made, cooking basic Northern dishes much to my husband's delight and satisfaction. I did make occasional saar that didn't call for coconuts, served dosas with coconut-less-chutneys and palyas that went without the mellowed sweetness from the much-desired-generous-garnish of fresh coconut. The pre-packed coconut I had bought long ago assuming would be good for curries was so sweetened, that it was consumed in desserts and occasionally bitter-gourd stews.

The little Southerner in me craved for the real deal.

So it had to be. A day I called for huli. Made the way my mother makes it, smashing whole tondekayi (known as tindora in hindi / ivy gourd in English) and tossing them in a delicate coconut based curry infused with garlic tempering. Little toiling and more satisfaction of finally accomplishing it - done, served and relished. In feeling of worth and delirious joy like none other. Of clinching rice between fingers, mashing them through huli and drawing morsel by morsel of it with fingers to satisfy the insatiable desire of being home. Of savoring comfort food that reminds me of my mother. Of swaddling in spices that brings aromas of her kitchen into mine. Deep satisfaction. Simple joys.

TonDekayi HuLi


TonDekayi MeNasina HuLi | Ivy Gourd in Spiced Coconut Curry

INGREDIENTS

20-24 ivy gourds( also known as tondekayi/ tindla/ tindora)
1/2 tsp. turmeric powder
Salt to taste

Grind to Paste:

1 cup grated fresh coconut
1 tbsp. thick tamarind pulp
5-6 red chillies
1 tsp. jaggery

For Tempering:

2 tsp. coconut oil
1 tsp. mustard seeds
3-4 garlic pods, smashed
A twig of curry leaves

DIRECTIONS

Wash the ivy gourds in running water and clean them on a kitchen towel. Snip off the tips at both the ends (as shown in the pic above). Using the wide bladed knife, smash the ivy gourd down against the blade, putting just enough pressure using the palms of your hand to smash it. We generally use a pestle to do this. A heavy rolling pin works fine too. What you get is a rough smash of ivy gourds that is still in tact and not broken apart. Transfer the smashed ivy gourds into a pressure cooker along with turmeric powder and salt and just enough water to cover the vegetable. Pressure cook it for 2-3 whistles. Meanwhile, while ivy gourds are being cooked, proceed to making the coconut curry.

Grind to paste the grated fresh coconut along with tamarind pulp, red chillies, jaggery. Add little water to enable smooth grinding. Set aside.

Release the pressure off the cooker and transfer the cooked ivy gourds along with the water into a steel vessel. Add the ground coconut paste, stir well and bring to a rolling boil. Adjust salt and more water depending on your preferred consistency. Simmer and let it boil for 5-7 mins for the spices to be absorbed.

Prepare the tempering by heating coconut oil in a small kadhai / wok. Add mustard seeds to it. As it begins to splutter, add smashed garlic and curry leaves. Fry them till the garlic turns golden brown. Add this to the prepared huLi. Serve hot with steamed rice.

TonDekayi HuLi

Moth ki Dal

Easy Moth Dal Recipe | How to make Moth ki Dal | Matki Dal
Two weeks ago there were signs of winter slowly slipping away giving their way to spring time. The snow shrank and shriveled away long ago, but the temperatures are still pitching low and below to call it the ideal spring time. Each time I look out of my window for that ray of warmth and sunshine playing its peek-a-boo, the sky is gloomy and dull, and warns of rains. More than a month ago we were hoping to welcome spring. Yet the weather is cold, wet and chilling.

Moth ki Dal 1


Spring may have been slower than expected this season, but after those dreary winters that had pretty much confined me indoors, watching the sun raise up in the morning and gleam till dusk, even though it may be quite occasional, gives me some hope that this month will be bright and cheerful with spring in its full bloom. The patches of dry twigs and fallen leaves have given way to fresh grass sprouts and tender new leaves. The black and white canvas has transformed to vibrant shades of green and blooming colors of spring. All I wish to do right now is shed my winter wears away and make way for lighter clothing, which seems to be distant at the moment. The weather Gods have been quite temperamental and the mercury still shows in single digits. With infrequent sunshine interspersed with drizzles, showers and windy chills, I think we may have to wait for that sunshine and warmth a little longer.

As the drizzles trickle down my window panes, there's nothing much I can do, but to wait and watch till the pours go away. Instead I sip this moth ki dal with steaming hot rice. I love the spice that makes it perfect for the cold weather. It's just so comforting.

Moth bean that's the heart of this dal is also popularly called as Matki. Though it's traditionally consumed for breakfast, after being sprouted and cooked, I use this dal often to accompany our main course meals, pairing them well with rice, rotis or puris. They have a taste and texture quite similar to that of moong, but they cook faster making it my preferred choice. It's spicy and soupy. This dal is a comforting dish for any winter or rainy day.

Mathki Dal


Moth ki Dal

INGREDIENTS

1 cup moth beans
1/2 tsp. turmeric powder
3 tbsp. vegetable oil
1 tsp. cumin seeds
2-3 small pods garlic, finely chopped
2 tsp. grated ginger
1 large onion, finely chopped
3 medium sized tomatoes, pureed (finely chopped also works great for more chunky textured gravy)
1 green chilli, finely sliced
2 tsp. coriander powder
1 tsp. cumin powder
1 tsp. red chilli powder
1 tsp. sugar
1 tsp. garam masala
Salt to taste
Chopped coriander leaves, for garnish

DIRECTIONS

Wash and soak the moth beans overnight or atleast 6-8 hours. Drain the water from soaked beans. You may either proceed with the recipe or choose to sprout them further for a day or two. To prepare the dal, pressure cook the soaked moth bean in 3 cups of water along with 1/2 tsp each of turmeric and salt for 3-4 whistles. Allow the press34e cooker to cool down completely. Meanwhile prepare the gravy for the dal. Heat oil in a thick bottomed pan. Add cumin seeds and allow them to splutter briefly. Next add in garlic and ginger and fry them for another 30 seconds on medium high heat. Then add the chopped onions and fry till they turn golden brown. Add the chopped green chilly and fry another few seconds. Next add the tomato puree (or chopped tomatoes, in case using) and fry till the oil oozes from the edges. Now add in the spice powders, the coriander powder, cumin powder, red chilli powder, garam masala and a dash of sugar. Stir well and fry for 2-3 minutes. Add the cooked moth along with a cup of water*. Bring the dal to a rolling boil and adjust the salt to taste. Remove from heat and garnish with chopped fresh coriander leaves. Serve hot with rice / phulkas / puris.

Moth ki Dal 3


Notes:

* Water can be increased or decreased depending on the consistency of the gravy you prefer.
* Sugar is optional, but I prefer adding a dash of it as it neutralizes the salt, the spices and tang.
* I like to add either lemon juice or amchur (mango powder) at times when there isn't enough sourness from tomatoes. This is just optional.
* I generally use vegetable oil for cooking our day to day recipes, however a dash of ghee / clarified butter enhances the taste of this dal. Skip if you choose to keep it vegan.

_MG_5757


Uddina ambade, Medu wade or uddina wade are all practically the same. Its all about the shapes. Uddina wade / medu wade are round, donut like with a hole in the center to ensure even cooking of these fried fritters and are often served with idlis or enjoyed as is for breakfast. Uddina ambade are smaller, round shaped fried fritters made with the same ingredients, often served as a tea time snack or as an accompaniment to an elaborate meal. In Mangalore, these very popular evening snacks are also sold as Biscuit ambades in konkani outlets and are relished with a spicy coconut chutney and tea or coffee.

Frying is not my forte. I panic, fumble and get fussy. While anything that is fried always tastes sinfully good, I hate the preparatory and the after work of cleaning oil and vessels that accompany it, also the fact that frying needs constant attention and hand work at the wok at all times. It's occasionally I get into those adventurous shoes when I think my husband and daughter deserve these treats atleast once a while!

These ambades are traditionally served with simple white coconut chutney. But for a spicy twist, I made a Tomato Peanut Chutney that my husband absolutely adores. I have made this chutney on several occasions and they go quite well with idlis, wadas, dosas and akki pundi. I reserve to post the chutney recipe for another day as they do deserve a dedicated post. Do try these ambades and let me know how you loved them.

_MG_5759


Uddina Ambade | Black Gram Fritters

INGREDIENTS

1 cup urad dal / black gram
5-6 whole black pepper, broken roughly in a mortar and pestle
2 green chillies, finely chopped
1 sprig curry leaves
1 tsp. finely chopped ginger
2 tsp. grated fresh coconut
Salt to taste
Oil for deep frying

DIRECTIONS

Wash the urad dal thoroughly and soak it in water for atleast 3-4 hours. This will help to soften the dal. Drain all the water out and grind the dal to a fine paste adding as little water as possible. The batter should be thick, but not stiff. Stiffer batter will result in dense ambades, while runny batter will soak in a lot of oil while frying. Incase the batter seems runny than thick, then you may add in a tablespoon of rice flour. Rice flour also makes the ambade crisp, so a teaspoon of it helps. The key to getting good ambades are in having the right consistency of the batter. Transfer the batter to a bowl and add in the finely chopped green chillies, ginger, grated coconut, peppercorns and salt to the ground batter. Beat the batter well with a wooden spoon and set aside.

Heat a wok-full of oil till its medium hot. Test the oil by dropping a pea sized batter to the oil. If it sizzles and rises to the top then the oil is ready. Lower the temperature and using a spoon, drop small dollops of batter into the oil side by side till they have just covered the oil. Do not overcrowd them, else they will be undone in center. Fry them on slow flame till they are golden brown. Remove and drain on a kitchen paper. Serve hot with chutney of your choice.

_MG_5755

BasaLe Soppu HuLi

How to make BasaLe Soppu HuLi| BasaLe Soppu Kodhel | BasaLe Soppu Sambhar
Homely, rustic and vastly organic. This is the kind of comfort food we grew up eating, often made from easily available farm grown wilds and greens fetched from aunt's estate, grandma's gardens and at times home-grown. I made this dish to bring back fond memories of a part of my childhood spent in the serene small town where convenience to such wild greens was in sheer abundance and was often subjected to lack of appreciation. And so much more to apologize myself for hating this dish through my growing up years. I remember disliking these greens in particular, eating them with puckered brows every time they made an appearance on the table, because my mom never spared cooking even those thick stalks of these creepers every time she lay her hands on them. I have seen dad relish them with relentless penchant. They were probably their favourites, rest assured they were not mine.

But now, it seems like ages since I had a chance to taste BasaLe Soppu or commonly called Malabar Spinach. The Malabar Spinach, also known as Red Vine Spinach grows abundantly in humid weather conditions. It has wide heart shaped leaves with soft-stems that grow into creepers. Despite my dislike for them through my growing up years, I missed them ever since I moved to Bangalore. I have never seen them around here where we live. If someone offered me this dish now, I would probably tag them 'exotic'. As kids, we were told these are healthy and have a great source of nutrition. But it's only now that I have learnt to appreciate those thick stalk-y chews of these wild creepers.

Homegrown BasaLe Soppu

(Pictured above, a lone creeper of Kempu BasaLe Soppu in midst of home-grown mint leaves)

A while ago, I grabbed a budding Malabar Spinach plant from a nursery on our trip back home. A handful of budding leaves on a stalk is all it stood with. Before I could let them grow and spread their wings, my impatience to revive my childhood memories with this dish took control over me and I went on a chopping spree. What remains now is a single barren short stalk that is making its way to climbing, twining, and creeping along another stem. As I patiently watch it grow to nurture new leaves, which will probably take a couple of months, I have a strong sense of excitement of using these home grown leaves in this home styled traditional recipe today. I hope you enjoy them as much as we did.

BasaLe Soppu Kodhel_1


Basale HuLi

INGREDIENTS:

1/2 cup Basale soppu (Malabar spinach / Red Vine Spinach)
1/2 cup togaribeLe / tuvar dal (pigeon peas)
1/2 tsp. turmeric powder
3 tbsp. kottambari beeja (coriander seeds)
10 + 2 Byadagi red chillies
1 tsp. hing (asafoetida)
1 tsp. jeerige (cumin seeds)
1 tbsp. kadale bele (split bengal gram)
1/2 tsp. menthya (fenugreek seeds)
1/2 cup grated raw coconut
Lemon sized tamarind
1 tsp. coconut oil
1 tsp. jaggery
1 tsp. mustard seeds
A sprig of curry leaves
Salt to taste

DIRECTIONS:

Wash and cook the togaribeLe/pigeon peas in pressure cooker along with turmeric till they are soft and mushy.

In a thick bottomed pan, dry-roast the coriander seeds, cumin seeds, methi seeds, split bengal gram, hing with about 7-10 red chillies till they are fragrant. Remove from heat and allow them to cool. Grind them to a fine paste with a handful of grated fresh coconut and tamarind. Set aside.

Wash the Basale leaves, along with their tender stalks. Chop them into small pieces. In a wide mouthed pan, cook the leaves and stalk in some water. As the leaves wilt and the stalks are cooked, add the cooked dal to this along with the freshly ground paste, a cup of water and bring to a rolling boil. Add a tsp. of grated jaggery along with salt to taste. Adjust the consistency of this huLi by adding more water to your taste and preference.

For the seasoning, heat a tsp of coconut oil in a wok. Fry the mustard seeds till they splutter. Add in torn curry leaves, hing and 2 broken red chillies. Fry for 30 sec and turn off the flame. Add this seasoning to the prepared huLi. Serve hot with steaming hot rice.

BasaLe Soppu HuLi_1


It's frustrating when I have the urge to blog to keep my space brimming with recipes, yet I can't seem to make time to load my webpage even occasionally. That's how hectic the past couple of weeks have been. Crazy and way too swift to fuel this space aptly. I hope I'll be back to blogging routine soon, but till then I leave you with a nice Chilli herb bread for a lovely Sunday morning.


I have no talks for you today, but just the right recipe for this bread and some quick snaps clicked to share with you. This delicious herb bread with a dash of cheddar cheese is great served with flavoured butter and accompanies well with soups and dips. Even better toasted.


Chilli Herb Bread

1 tbsp. yeast
1 cup warm water
2 1/2 cups bread flour
2 tbsp. olive oil
1 tsp. chopped red chilli / chilli flakes
1 tablespoon dried Italian herbs
2 tbps. grated cheddar cheese* (optional)
Salt to taste

Dissolve yeast in half a cup of warm water and sugar and set aside for five minutes. The mixture will become frothy.

Stir in olive oil, salt, chilli flakes, cheese, dried Italian herbs and flour into the yeast mixture. Gradually mix in the next half cup of water. Using a wooden spoon, stir to form the dough. Bring the dough together and knead for roughly 10 minutes. If the dough is loose and sticky, add in more flour and knead further. The dough should become elastic. Place the dough in an oiled bowl, and turn to cover the surface of the dough with oil. Cover with a damp dish towel and let it rise for an hour, or until the dough has doubled in size.

Once the dough has doubled, punch it down to release all the air. Shape into an oval shaped loaf or a free form as you prefer. Place the loaf on a greased baking tray and let it rise until it's doubled in size again, about a 30 minutes.

Bake at 180 degrees C for 35 minutes. Remove and let cool on baking rack. Slice and serve with dollops of butter and cheesy dip to accompany.


*For a Vegan option, skip the grated cheese totally.